Welcome to SmartMag!
Thanks for Buying
First of all, thank you for buying this theme. To make your experience pleasant, we've added as much info as needed in this documentation. If you're stuck with anything, please refer to support forums.
- Created By: ThemeSphere
- Support Site: ThemeSphere Support
- Social Media: Twitter Facebook
- Latest Changes: Changelog
Installation
There are two methods to install the theme. If the normal installation method (a) is not supported by your web host, you will have to use the alternate option (b).
a. Normal Installation
- Go to ThemeForest Downloads and next to SmartMag, click the Download button. On the dropdown menu, click on All files & documentation.
- Extract the zip file in your computer. Browse through the folder that starts with the name themeforest-. You will find the smart-mag.zip file here.
- Login to WordPress Admin and browse to Appearance > Themes.
- Click on the Add New button and click Upload.
- Browse your computer to select "smart-mag.zip" (it's the file you got in Step 1). Click "Install Now" button.
- Once it's uploaded, click the Activate link.
- Go to Appearance > Install Plugins and install the required and recommended plugins.
- All done. Now proceed to What to do next?
b. FTP Installation (alternate method)
- Use your FTP software to browse to wp-content/themes folder.
- Extract smart-mag.zip and upload the smart-mag folder.
- Once it's uploaded, go to your WordPress Admin, browse to Appearance > Themes.
- Click the Activate link.
- Go to Appearance > Install Plugins and install the required and recommended plugins.
- All done. Now proceed to What to do next?
Important After activation, you will be presented with several plugins that you have to activate. Do not forget to activate them all or not all of the theme features will be available.
Note If you have existing content and featured images, you will have to install Regenerate Thumbnails plugin and run it from Tools > Regen. Thumbnails.
Regenerate Thumbnails
If you already had images in your Media Library when you installed SmartMag, you will have to resize your image thumbnails. Follow these instructions:
- Go to Appearance > Install Plugins and install Regenerate Thumbnails plugin.
- Next, go to Tools > Regen. Thumbnails.
- Click the Regenerate All Thumbnails button. It will take some time depending on the number of images you have. DO NOT close your browser.
Install Required & Plugins
Once you activate the theme, to get full theme functionality, you will have to install the required plugins. You can also install the recommended plugins to further enhance the theme features, based on your requirement. Finally, there are a few advanced & optional plugins that are only required for a few users (read more).
To install these plugins, go to:
- Go to SmartMag > Install Plugins.
- Tick the Required plugins, and all the recommended plugins you would need to use.
- Once selected, under Bulk Actions, click Install and then click Apply.
About Optional & Advanced Plugins
The plugins under this heading should be installed only if you need a feature they provide. The Advanced plugins affect performance unless configured properly and may require a powerful webhost.
- Bunyad AMP
- This is a heavy plugin and if you use it, you must use a cache plugin (see performance guide). Learn more about AMP.
- Bunyad Instagram Widget
- Add a widget to show latest public images from your Instagram account.
- Self-hosted Google Fonts
- Another lightweight plugin, needed only if you have a legal reason to not use remote fonts.
- Sphere Post Views
- Post views counters for post meta, and for sorting posts. Learn More
Import Demos (optional)
If it's a fresh site (or a test site) with no content, it's a good idea to import one of the demos with Full Content to get you started. You don't want to do it on a live production site as it will import several posts, pages, and images.
- Go to your WordPress Admin and to SmartMag > Install Plugins and install/activate all the plugins.
- Navigate to SmartMag > Import Demos.
- If it's a site with existing content, MAKE BACKUPS before proceeding with a Full Import - not required for settings only.
- Read the instructions on screen and begin import.
Tip If it fails, you will have to request your webhost to increase your PHP max_execution_time (or any other webserver timeout to at least 120 secs) and memory_limit (to at least 196M) temporarily. If you tried it on a fresh WordPress install, you can go back to fresh install by using the "WordPress Reset" plugin.
How to Update the Theme
We frequently release theme updates to offer new features and fixes. Before performing any major update, we highly recommend making backups.
Updates go without issues most of the time. But if something goes wrong, it’s better to have a backup. Most webhosts offer a one-click backup feature. If you’re unsure on how to make backups with WordPress, try one of these plugins:
Updating the theme
Starting from SmartMag v8.0, one-click updates are included within the theme. So you can update from WordPress normally like you would do for any core theme. For older versions, or for manual update info, read this guide (Login to your support account to view).
For one-click updates, an Active Theme License is required. Make sure your theme license is activated from SmartMag > Welcome page.
On each new update, a message will also appear in your WordPress admin area notifying you of the update and allowing you to update with one-click. You may also enable auto-updates like WordPress core themes and plugins, but we recommend one-click updates instead.
Additional steps after each update:
- Plugin Updates: Make sure all dependent plugins are up-to-date from SmartMag > Install Plugins.
- Clear Caches: From your cache plugins, make sure to clear all caches.
Setup Your Site
Once you're done with theme installation, it's time to setup your blog. What to do next:
- Add your logo and configure your header.
- Create and configure your Navigation Menu.
- Setup your categories.
- Follow Adding Posts section to add a few posts.
- Learn how to setup your homepage.
- Setup your sidebar and add widgets.
- Activate and configure your footer.
- Customize fonts & colors, if you want to.
- Read other sections on the right side of this documentation.
Homepage Setup
There are many different widgets/blocks that can be used to construct your homepage (or any page).
Build Homepage With Elementor
We'll be using Elementor Pagebuilder plugin to build the homepage. Please make sure it's installed and active.
If you have never used Elementor before, please get some basic knowledge of using Elementor via these links: (a few minutes is all you need)
- Create a New Page with Elementor.
- Basic Building and using Sections and Columns.
- Preview & Publish pages.
- How to Move Sections (we highly recommend Navigator)
Now that you have basic knowledge, let's begin:
NOTE: If you imported a theme demo, you don't have to create a new homepage. Go to your site home and click "Edit With Elementor" in the adminbar at top, or edit the page "Homepage" in WordPress admin and click Edit with Elementor button.
- Ceate a new page and select the page template Pagebuilder - No Paddings & Full Width under Page Attributes (on right side of WordPress editor).
- Click Edit with Elementor button.
- Now you can start adding content. Follow along, below.
Import with Smart Studio
The easiest way to get started is to import a pre-made Homepage layout.
- Click the Smart Studio button to bring up the Smart Studio popup.
- Navigate to Homes & Pages and click on the homepage you wish to view or import.
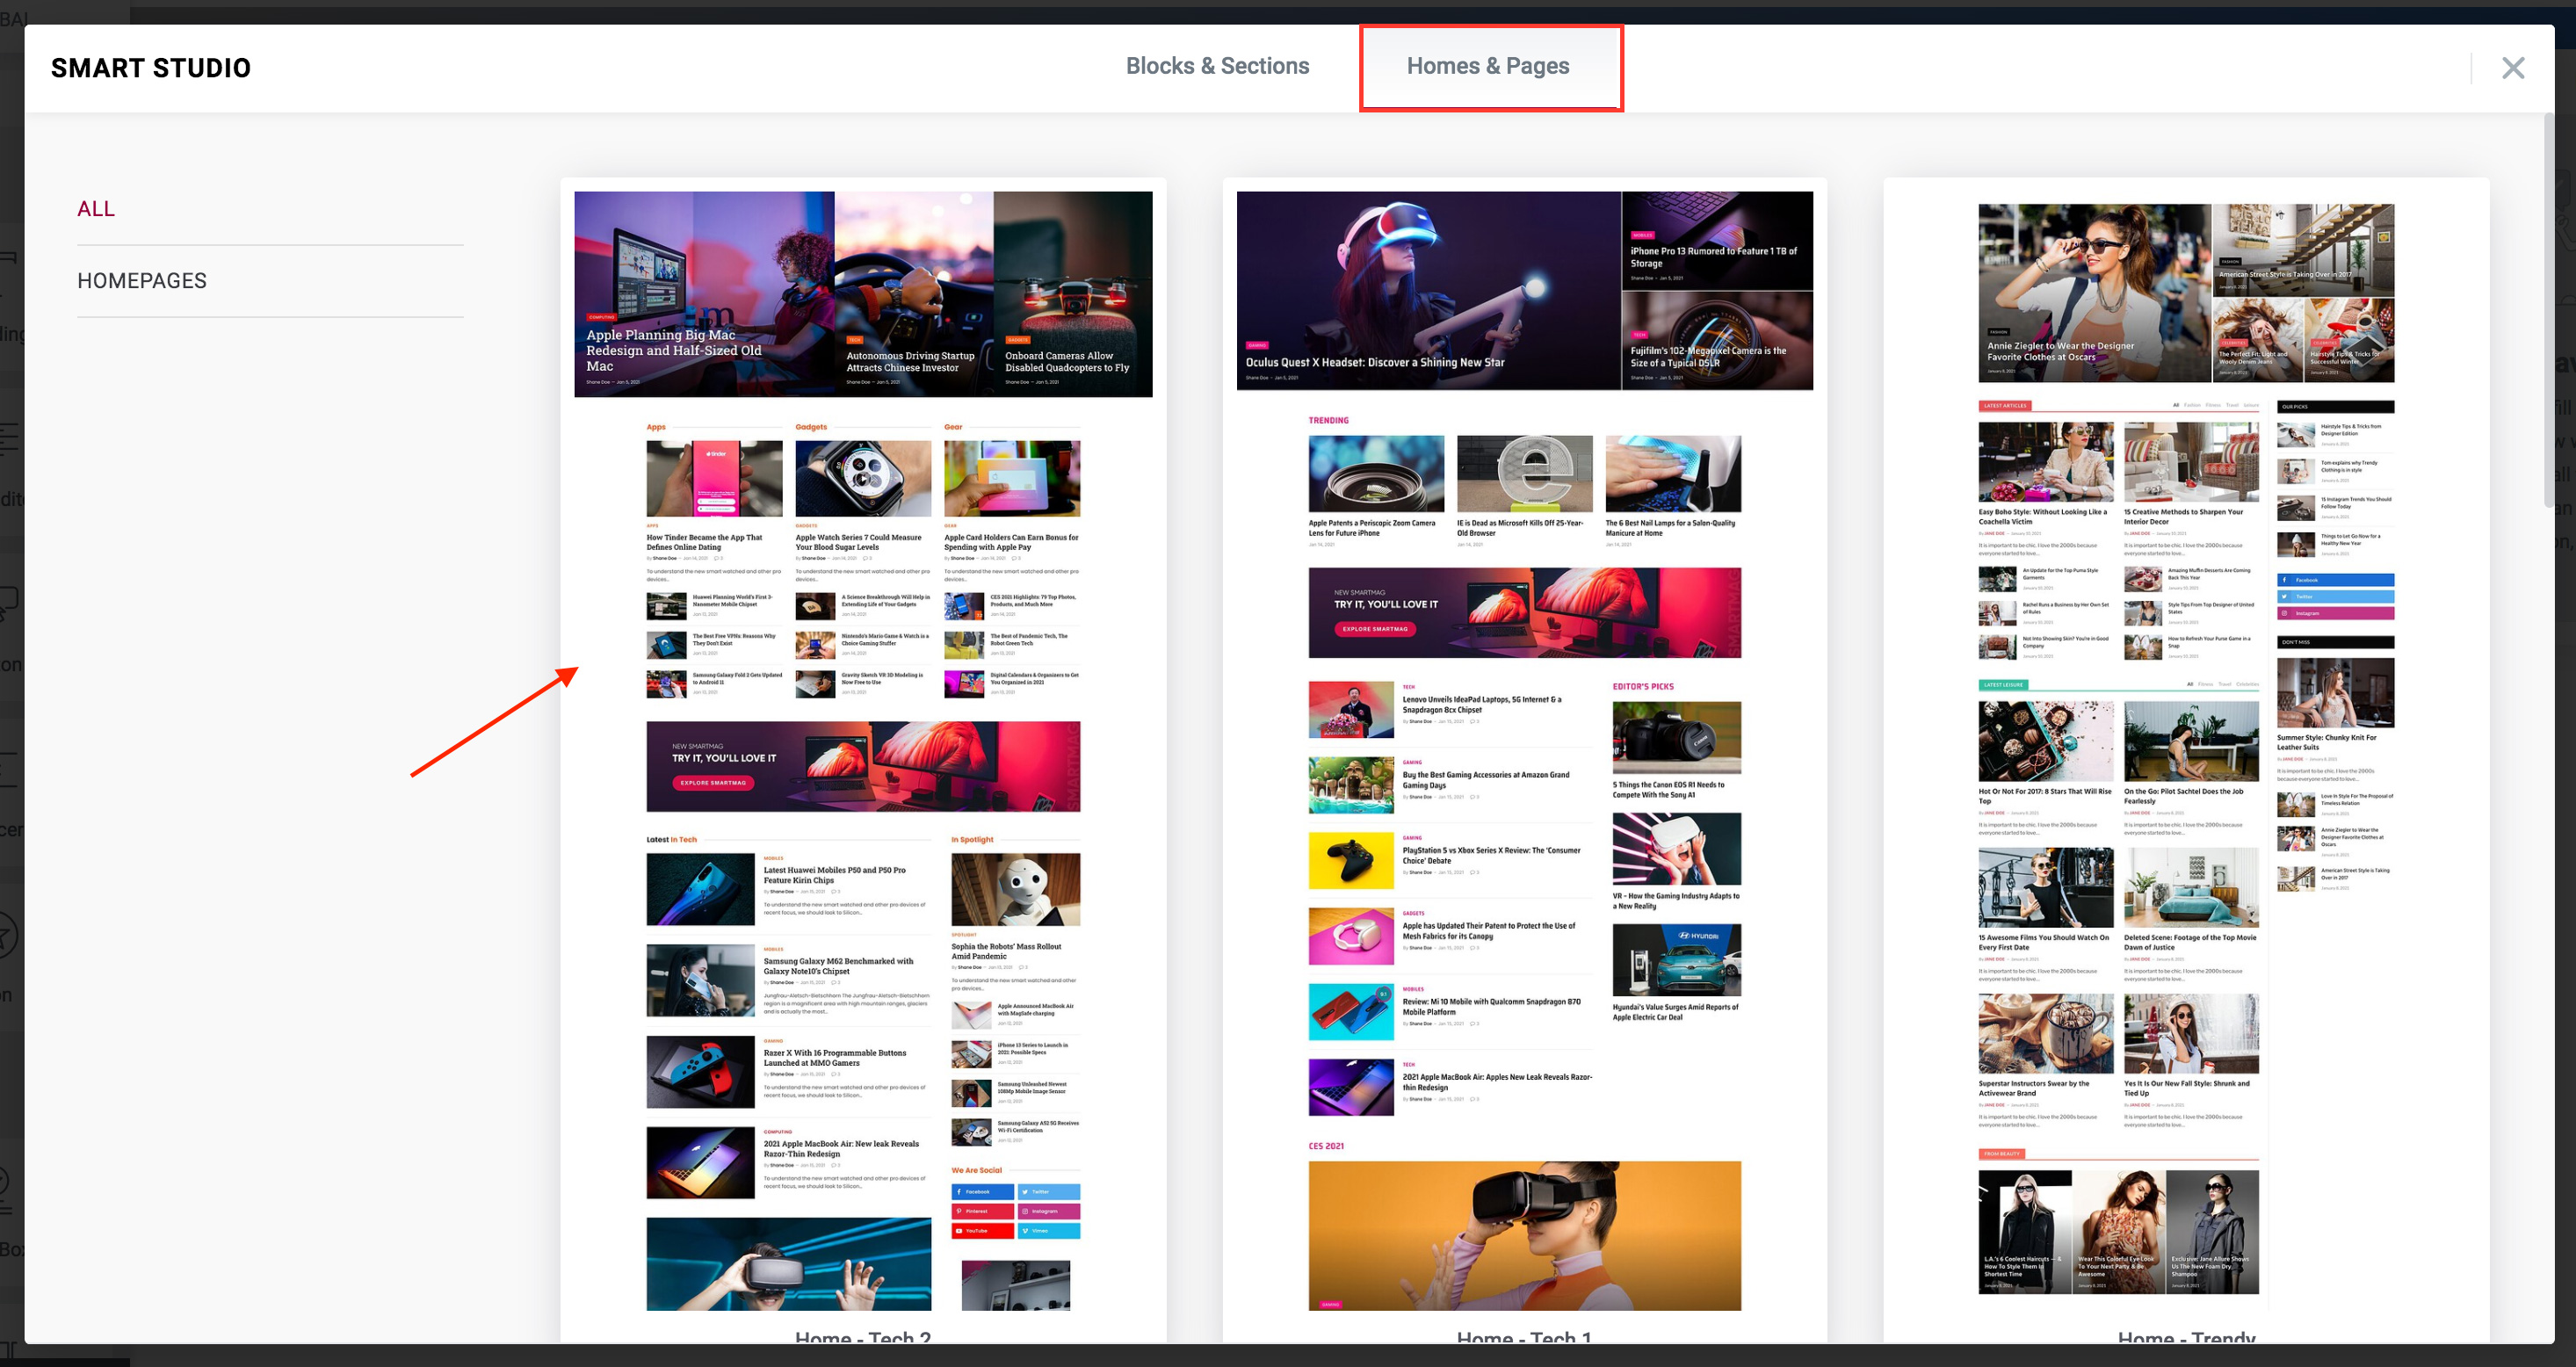
- Click the Insert button on the next screen.

Start editing the blocks, widgets, and sections. Learn more about editing blocks below.
Note Some blocks will look different from screenshots. This is because they adapt to your global settings. For example, block headings default style, typography, and so on will be used from your Customizer settings.- Preview or Save your page.
Adding a Section with Sidebar
With the basic knowledge of Elementor from above, you can add a section with sidebar.
The easiest way is to click the Smart Studio button and under Structure, import Content + Sticky Sidebar.
But if you wish to do it manually, learn more below:
- Create a section with the structure of right sidebar.
- Hover over the column and click the column icon. OR, right click on the column and click Edit Column
- In the left pane, check the toggle Is Sidebar.
- You may also check the Sticky Sidebar to make it sticky.
Smart Blocks in Elementor
We have 12 Flexible Smart Blocks in Elementor that are extremely customizable into countless variations. You will find them under SmartMag Blocks section on the left pane of Elemnetor.
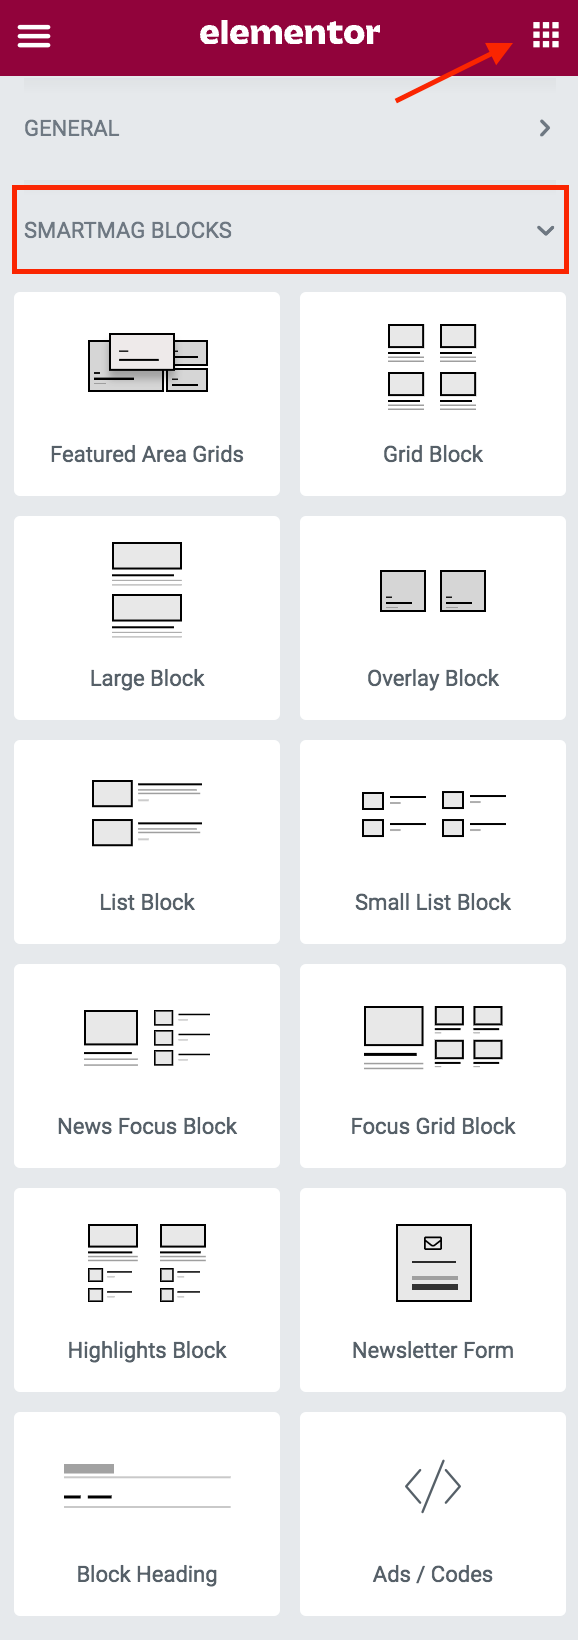
Adding a block and customizing it is quite simple:
- Start by adding an Elementor section with your desired columns. (If you aren't sure how, read elementor section above).
- Click and drag a block, for example Grid Block, and drop it into your desired column / section.
- You may customize the block in the left pane now. See common block customizations below.
Importing Premade Blocks
With Smart Studio, apart from Homepages, you can also import blocks and section.

- Click the Smart Studio button to bring up the Smart Studio popup.
- Use the filters on left side to navigate to Post Blocks or Home Sections (or anything else you want).
- Click on your desired block in the listing, and on next screen, click the Import button.
- Start customizing. Click on the block and it will bring up the edit panel on the left side. Set your category, heading and so on. See Common Customizations.
Common Block Customizations
We would recommend exploring and trying out the customization options under each block. The Smart Blocks are extremely flexible.
1. Setting the Category to Show Posts From
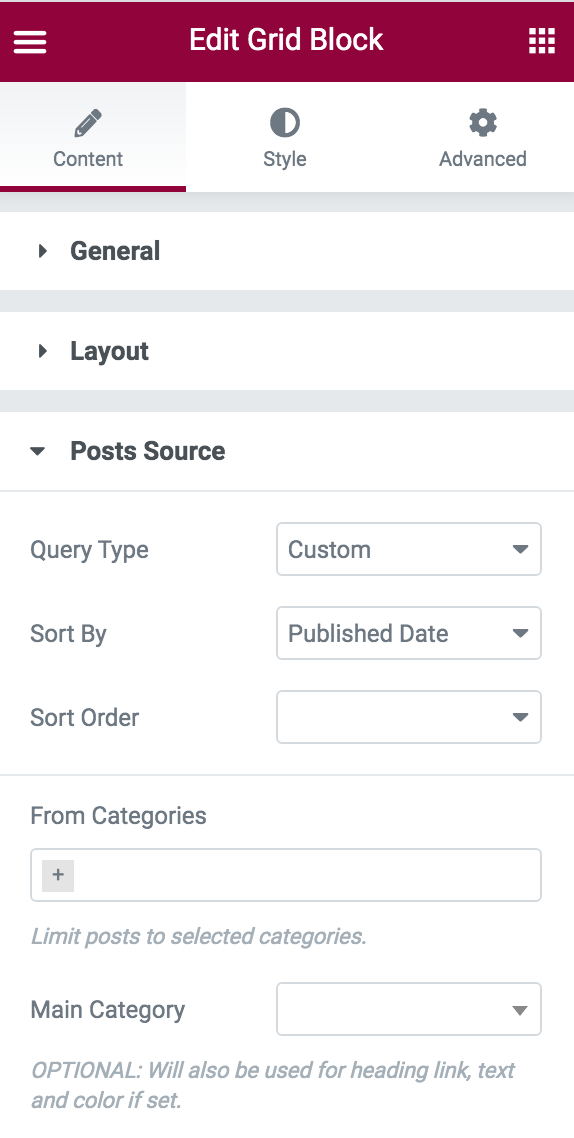
- In the edit panel, click the Posts Source section. There are two options to limit posts to a category, From Categories and Main Category.
- Using Main Category is recommended when it's only one category. This option uses any custom color set for this category and also uses the category link in block heading.
- From Categories may be used any time when you need posts from multiple categories.
2. Enabling and Styling the Block Heading
Block headings can be enabled from the Heading section of edit block panel.
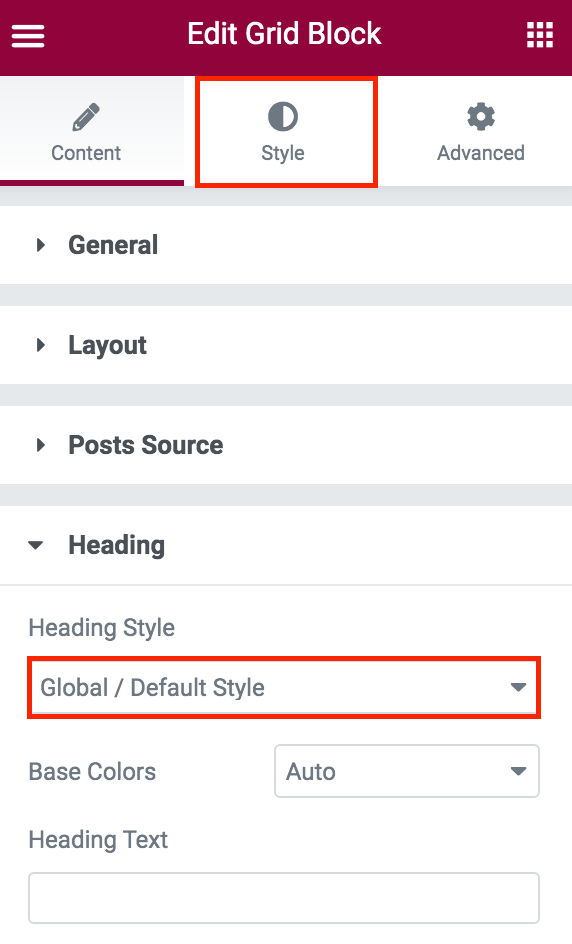
- The most basic settings are to select Heading Style and enter the Heading Text.
- Generally, using a pre-made block style is enough. The global block heading settings from Appearance > Customize > Blocks & Listings > Block Headings Style also apply.
- Additional customization is available from the same panel in Style tab under Style: Blocks Heading section.
3. Using Section Queries
When you add multiple blocks in a section in Elementor and want them to act like a single block, for example, skipping posts already displaying in block 1, block 2 and so on, you can use our most unique feature: Section Queries.
You can set the query in the section settings. Doing so will make all the blocks under this section act as if it were one block. Here's an example video showing blocks using section query:
- Bring up the section settings by clicking the bars icon or right click and "Edit Section". If you're unsure how to edit sections, please familiarize yourself elementor basics.
- In the left panel, click to expand Section Query and set your category, tags or any post source like you normally would for a block.
- Now add your blocks. Each time you add a block, in the left panel under Posts Source set Query Type to Section Query.
- Your blocks will now use the parent section's post source settings such as any category you may have specified. The posts already displayed in a block will be skipped from the next block and so on.
Setting The Homepage
Once you have created a page that you would like to use as your homepage, follow these steps:
- Go to Settings > Reading.
- Choose "A static page" option for Front page displays.
- Next to Front Page, select the page you created to be used as the homepage.
- Save Changes.
Header Setup
SmartMag comes with a Smart Flexible Header customizer that lets you build your header or import and customize and premade one.
Using a Header Preset
To use a header preset:
- Go to Appearance > Customize > Header & Nav Menu > Premade Headers / Presets.
- Click on the header you wish to import.
- Start customizing and Publish.
Setting Your Logos
We recommend using two versions of the logo. One the base logo size and another 2x/retina size (twice the width and height of original) for higher resolution devices.
If your logo is large, you will also need another version for mobile devices. Since mobile devices are generally 2x/retina, only 2x version is needed.
- Go to Appearance > Customize > Site Logos.
- Upload your normal logo in Logo Image and the 2x version in Logo Image Retina (2x).
- If you have a mobile logo, upload it under Mobile Logo Retina.
Note: This logo will be shown on mobile devices and in off-canvas menu. - Publish to save.
Customizing Header Layout
Using about 16 elements, you can customize or build your own header layout. The header consists of 3 sections: Top Row, Main Row, and Bottom Row. Each row has 3 Columns: left, center and right.
- Go to Appearance > Customize > Header & Nav Menu > Layout: Main Header.
Start by selecting the width.
- Site Width + Full BG
- This limits the header content to side width, but adds a browser width background color (if any set, or transparent)
- Full Browser Width
- The header has no wrapper so header content go to browser width.
- Site Width
- Limit header content to site width. The background color (if any), only apply till site width as well.
- Expand the Main Row. You can add Elements to Left-aligned, in Center or right-aligned.
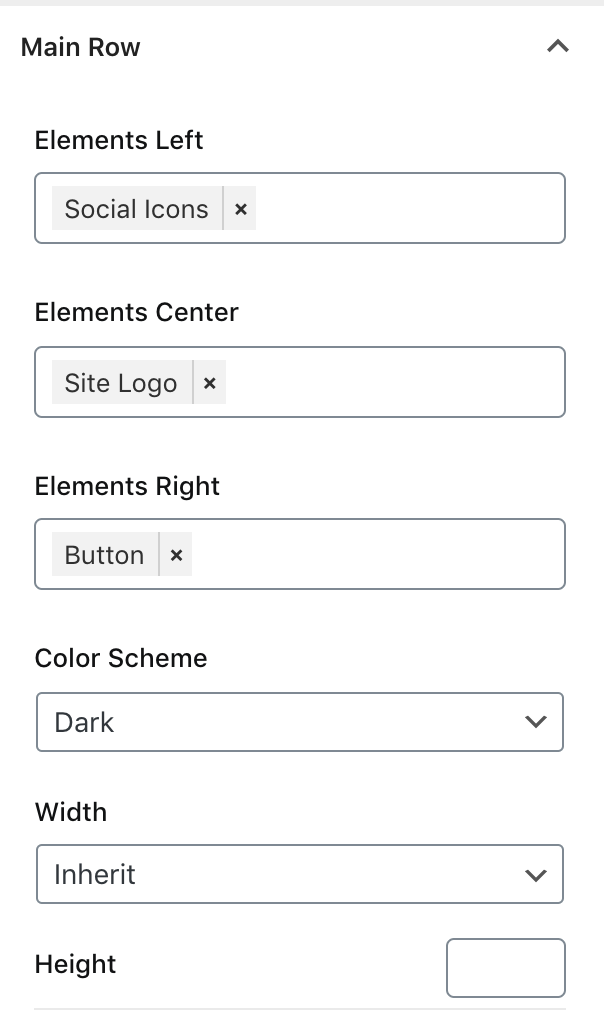
- You may delete or reorder elements within a section (such as left).
- Set the height and explore several other options like color scheme, and custom colors.
Mobile Header Layout
- For mobile header layout, go to Appearance > Customize > Header & Nav Menu > Layout: Mobile Header.
- The same instructions from previous section are also for Mobile Header.
- Under most Element settings, you will find a Mobile section.
Customizing Header Elements
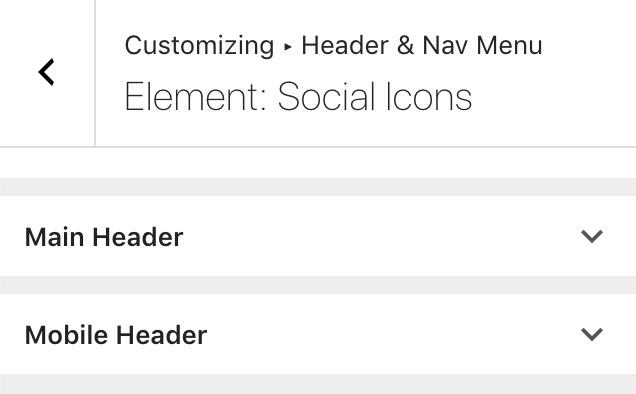
Now that you have a basic layout, you may wish to modify the elements you added. Each of the elements have settings on the previous screen. For example, if you wish for Social Icons:
- Go to Appearance > Customize > Header & Nav Menu > Element: Social Icons.
- You can select the services to show, for Main Header and Mobile Header separately.
Similarly, for any Element, go to Appearance > Customize > Header & Nav Menu and navigate to the section for that element.
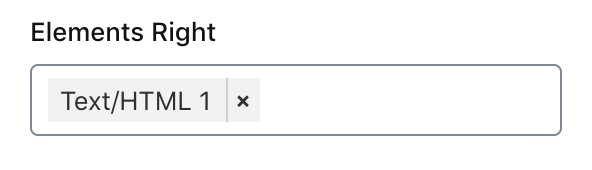
Adding Advertisements
If the header preset you selected shows an advertisement, it will be most likely using Text Text/HTML 1.
- Go to Appearance > Customize > Header & Nav Menu > Elements: Text/HTML.
- Expand the Text/HTML 1 section.
- Add your Ad Code or Shortcode.
- Publish.
However, if your current header layout doesn't have an ad element, you will have to add it to one of the sections. See customize header layout section above and add Text/HTML 1 to the appropriate Row.
Setup Navigation & Menus
If you have imported demo content, follow (a) else follow (b) to create a new menu.
(a) Existing Menu
- Go to to Appearance > Menus.
- In the "Manage Locations" area, under Main Navigation, select Main Menu. Click Save.
(b) Creating a New Menu
- Go to to Appearance > Menus.
- Click on the + button or the create a new menu link. Enter a menu name and click Create Menu.
- Using the Custom Links and Pages boxes at the left, add items to the menu and drag/drop to arrange them.
- (optional) If you would like to use this menu in navigation, in the "Manage Locations" area, under Main Navigation, select your newly created menu. Click Save.
- Click Save Menu and that is all.
Mega Menus
There are two types of mega menus that SmartMag is equipped with.
Links Mega Menu
The first one is used to create an organized multi-column list of links. We call it the "Links Mega Menu".

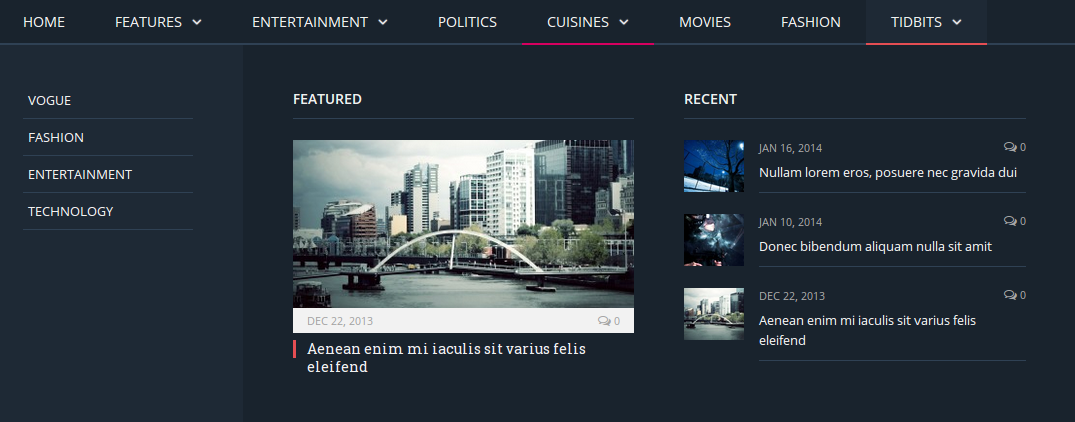
Category Mega Menu
The category mega menu is a 3 column mega menu that shows sub-categories in first column, the latest featured post in the second, and 2 recent posts in third.
Add Mega Menu
To add mega menu to your menu item:
- Go to to Appearance > Menus and select your menu.
- Expand the item you wish to add mega menu to by clicking the arrow icon.
- Under Mega Menu, select Mega Menu for Links or Category Mega Menu.
- Save Menu. Next configure sub-items (below).
Configure Mega Menu Items
To make mega-menus work, you have one additional step of adding sub-items.
For Category Mega Menu, add a few sub-categories as sub-items (drag/drop them under a parent category in menu). Example:

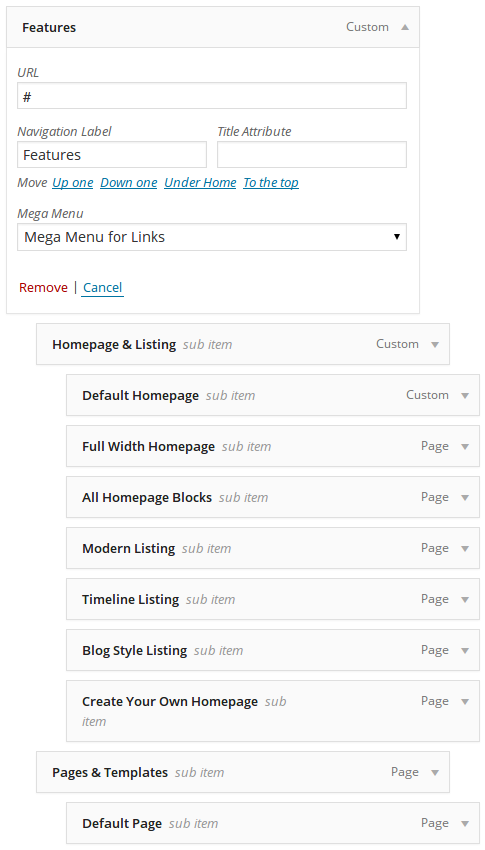
Links Mega Menu is configured by adding Custom Links to be used as headings. You can use 4 of these headings. Then, a 3rd-level sub-items are added which are displayed as links, under each heading. Example:
Customize Navigation Menu
You can customize the color scheme, spacing and several other settings for Navigation Menu.
- Go to Appearance > Customize > Header & Nav Menu > Navigation Menu.
- Customize Typography and spacing settings as needed.
- The navigation menu inherits the color scheme of the Header Row it was added in. In your Layout: Main Header, if Main Nav is present under a row that has color scheme set to Dark, it will use Dark Scheme.
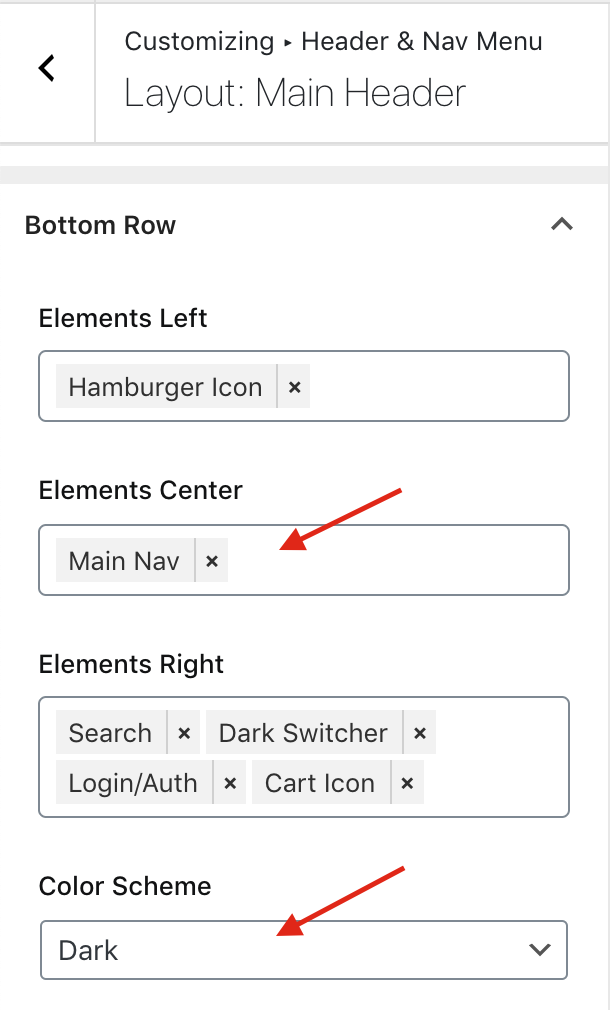
- Depending on the color scheme, you will either expand Light: Navigation Colors or Dark to modify the colors.
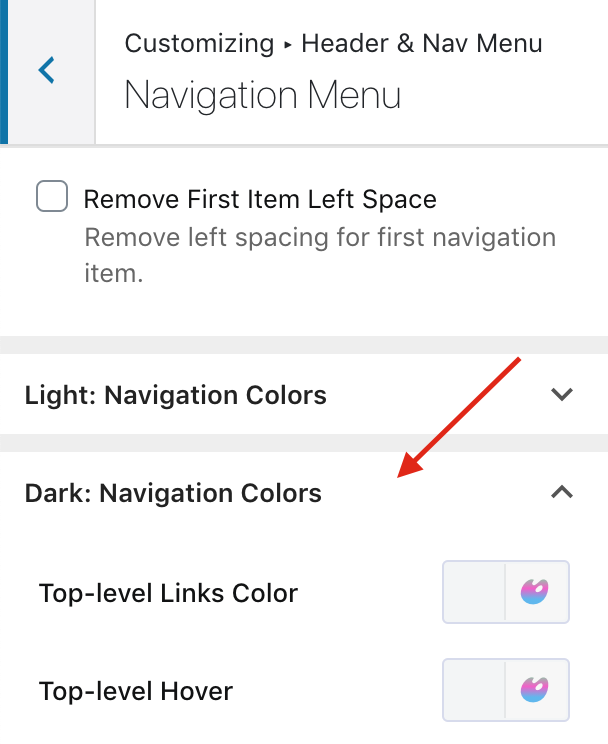
- Publish.
Navigation Breadcrumbs
SmartMag has breadcrumbs enabled by default on all pages but the homepage (they would be redundant on homepage). The navigation breadcrumbs not only aid in navigation but also are immensely valuable for Search Engine Optimization (SEO).
The default breadcrumbs have Rich Snippets built-in so more SEO is undesirable. If you use a SEO plugin like "WordPress SEO by Yoast", please do not enable the breadcrumb functionality of the plugin.
However, if you wish to disable the breadcrumbs: (NOT RECOMMENDED)
- Go to Appearance > Customize > Main Layout & Sidebar > Breadcrumbs..
- Click to toggle off next to Enable Breadcrumbs.
- Publish.
Setup Categories
Setting up categories for this theme is no different than ordinary category setup in WordPress, however, we provide some additional layout settings.
Go to Posts > Categories and fill in the info required. To choose the correct layout, refer to the Demo.
Global Settings for All Categories
It's preferred to setup global settings from Customizer instead of setting per category.
Go to Appearance > Customize > Categories & Archives to set layouts, and featured grids for all your categories.
Per Category Settings
Custom Listing Layout
You can create a custom layout for categories and archives using the Archive Builder.
Once you have created a custom archive layout using the builder, you can either assign it globally (as explained in the Archive Builder section below), or you can assign it to this specific category you're adding/editing.
Using the Default/Customizer option will use the global setting. Setting it to None / Disabled will disable the custom layout for this category (even if one's setup globally).
Note: None of the other settings below will apply when using a custom layout.
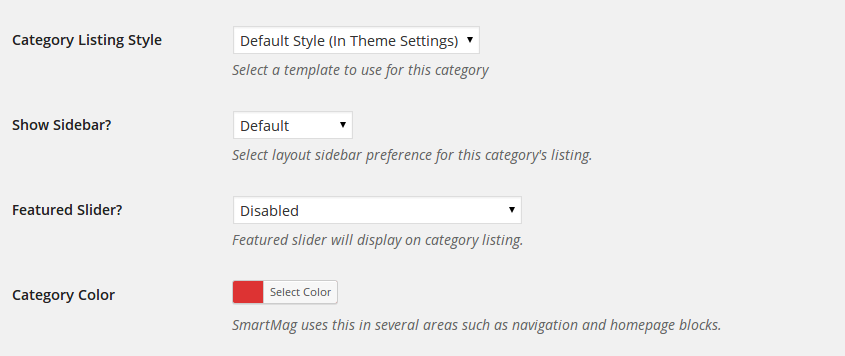
Category Listing Style
There are several layout styles and options to choose from:
- Grid Style: 2 columns grid.
- Grid Style: 3 columns grid.
- Classic Large Style
- Overlay 2 Columns
- Overlay 3 Columns
- Overlay 4 Columns (For when archives layout set to full)
- Posts List Style
- Legacy Classic large
Show Sidebar?
This option allows you to set whether you would like to show the sidebar in the category listing or not.
Note It does not affect the "single post" view in the category. You can modify whether to show sidebar for a post or not for each post.
Featured Slider?
SmartMag supports featured sliders for categories. There are two options here:
- Show Posts Marked for Featured Slider: This will show posts that have "Featured Slider Post?" checked.
- Show Latest Posts: Show most recent posts in slider, ignoring "Featured Slider Post?" setting.
Category Color — Optional
SmartMag uses the category color to add an underline in the menu for the category. It's also used in homepage blocks for category headings and label colors.
Posts Per Page — Optional
By default posts per page setting from Settings > Reading is used. This option can be used to override that.
Pagination Type
- Default uses the settings from Appearance > Customize > Categories & Archives > Pagination Type.
- Page Numbers / Normal will set it to typical pagination with page numbers.
- Load More will add a Load More button.
- Infinite Scroll will automatically load more posts as user scrolls. No pagination will be shown.
Archive Builder: Custom Layouts
Using the archive builder, you can build custom layouts for your categories, tags and other archives.
- Go to WordPress Admin dashboard and browse to SmartMag > Custom Layouts.
- Click on Add New button.
- Enter any name for your archive layout.
- Click Create Template.
Import An Archive Layout
You can either import a pre-made custom archive layout or build one yourself (more on that below). To import, once you're in the Elementor Builder, you can follow these steps:
- On the right side, click on the red button titled Smart Studio.
-
In the popup, click Homepages & Layouts and select Category/Archives from the left side.
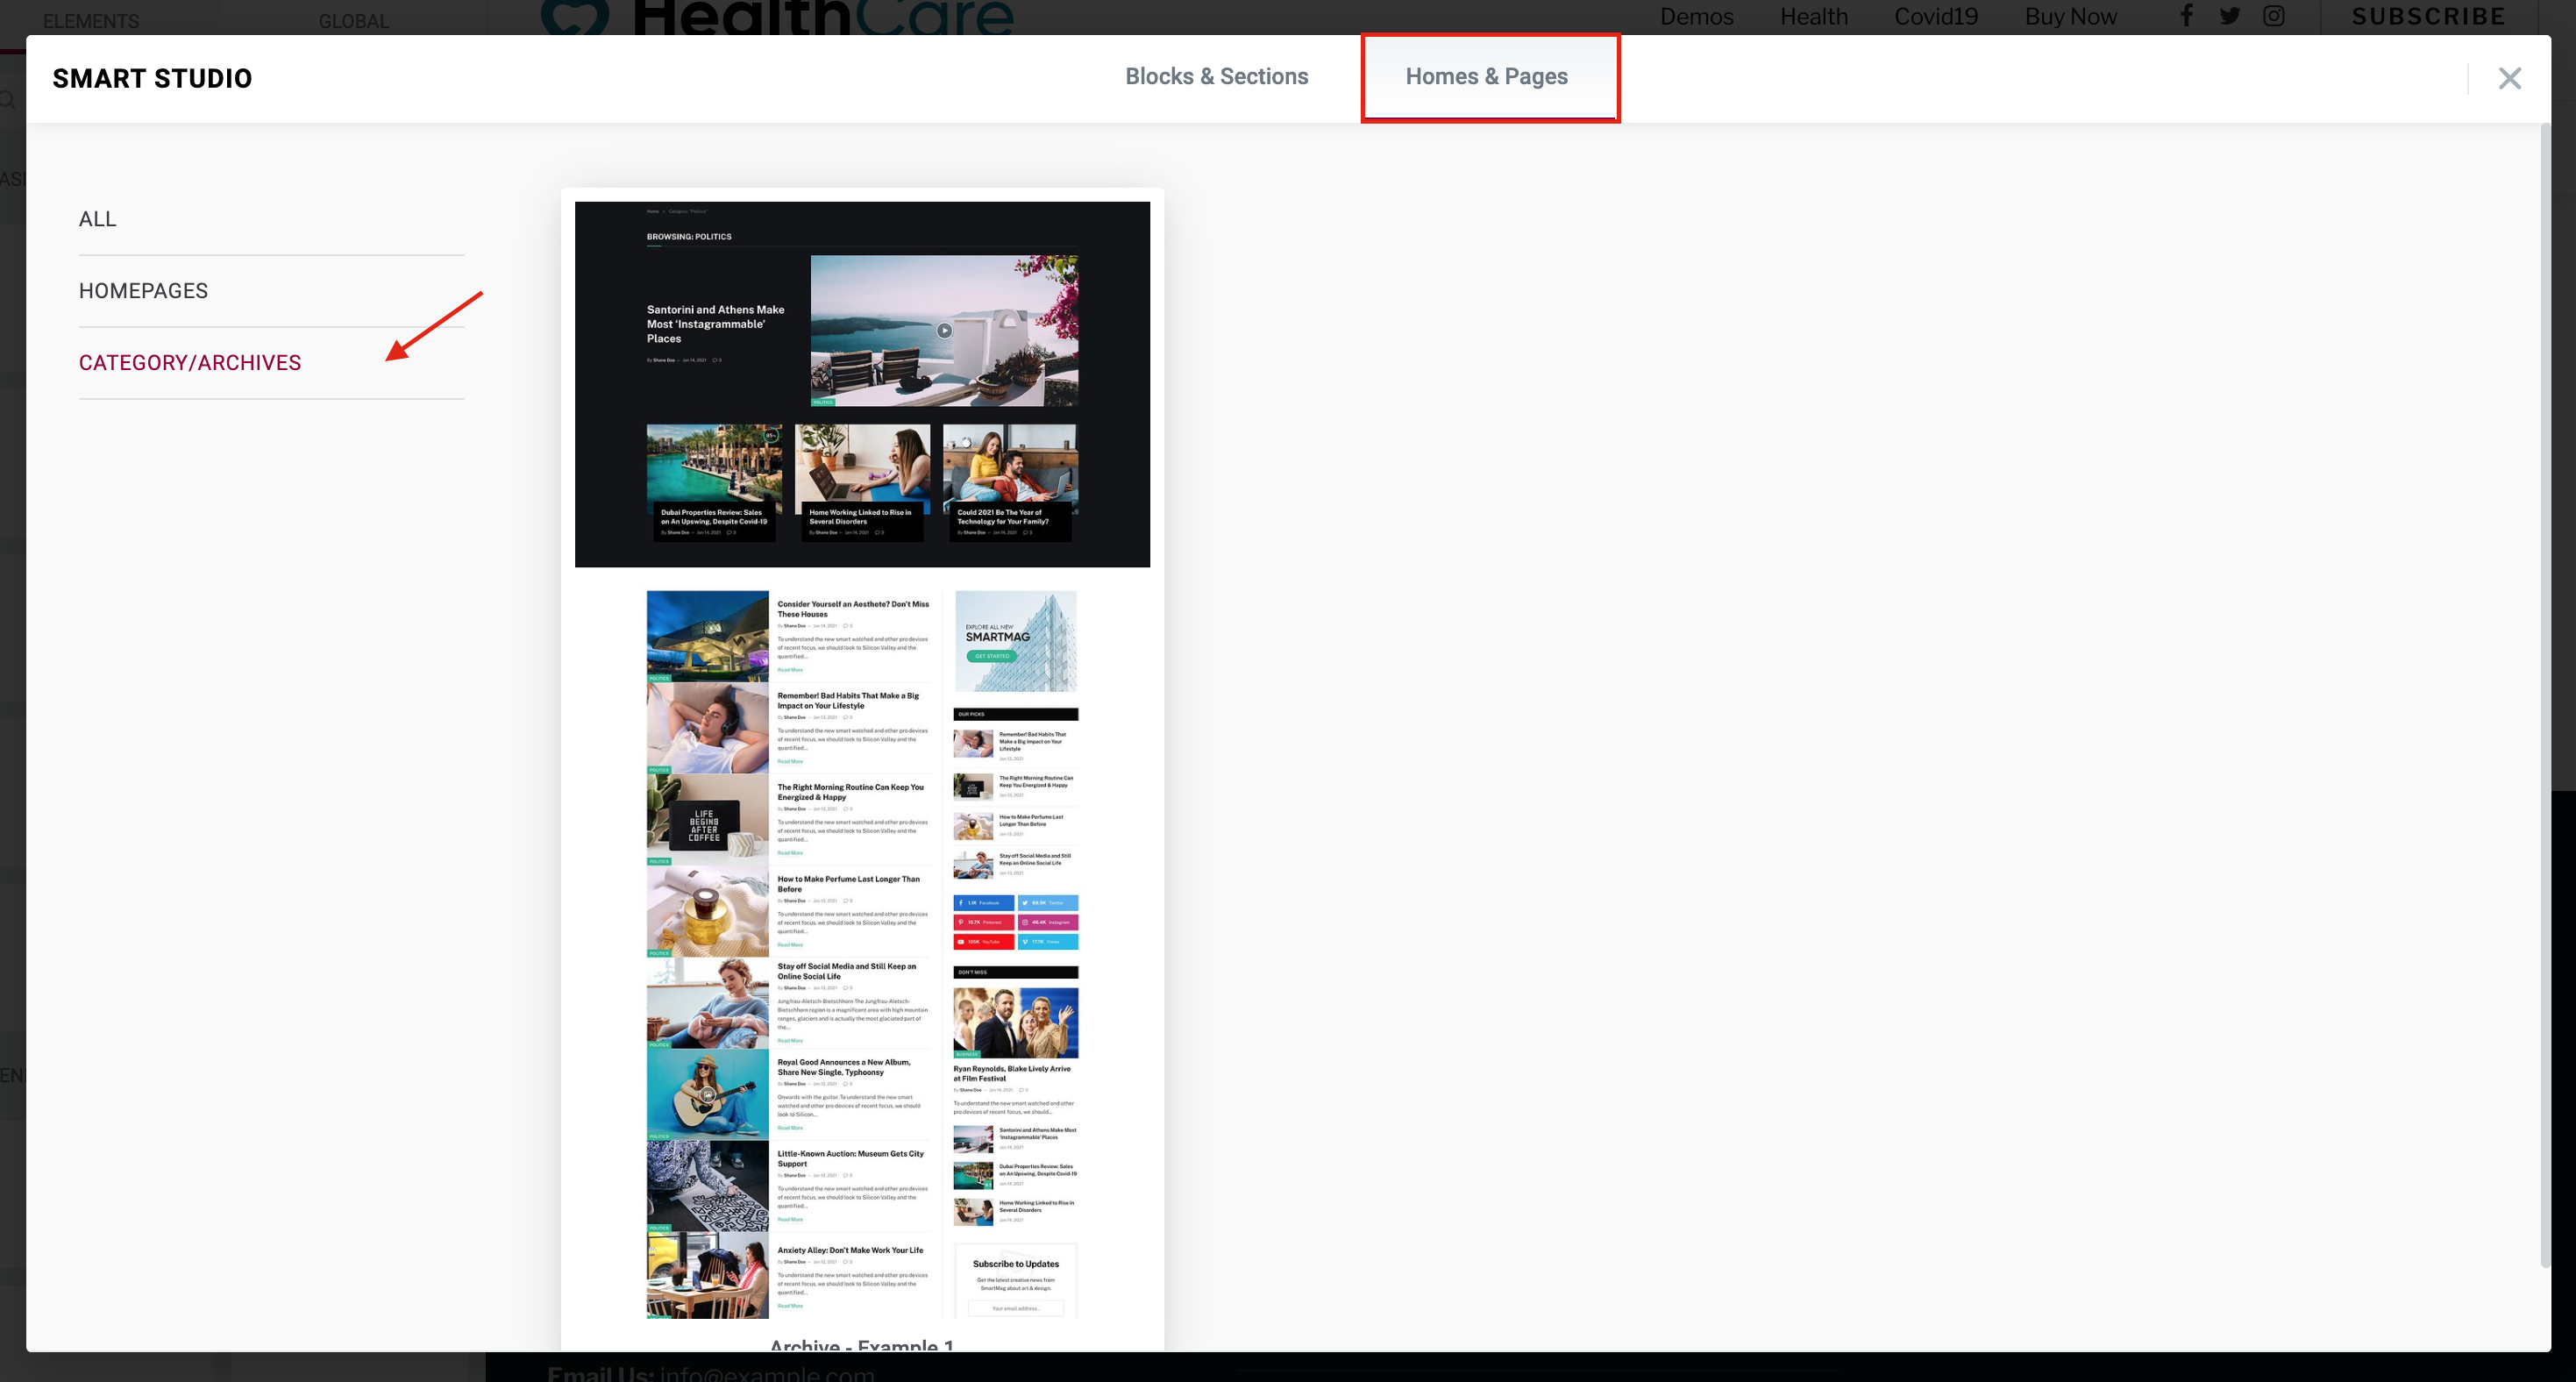
- Click on a layout. Next click on the Insert button.
- Hit the Elementor Publish button at bottom left.
Assign the Layout to Categories Or Archives
After setting up the layout, you have to assign it to a category. If you only want to use it for a specific category, see Per category settings above. To apply it globally to all categories, or archives:
- Go to Appearance > Customize > Categories & Archives.
- Next to Category Listing Style select "Custom Layout".
- Under Category Custom Layout select your newly created layout name.
- Similarly, you may also assign it to all Archives by using the same method as above.
- Publish.
Advanced: Building Custom Layouts
This is the same as building normal layouts in Elementor, with a few distinctions detailed below.
Required Knowledge To use the archive builder, you must be familiar with using the Elementor page builder, that is also used to build the homepage. Please first learn the Elementor basics if you haven't already done so.
Archive/Category Title & Description
You will need to use dynamic tags for your Archive Title to show the category or archive name of the archive being viewed. If you intend to use this layout for only a single category, this isn't required.
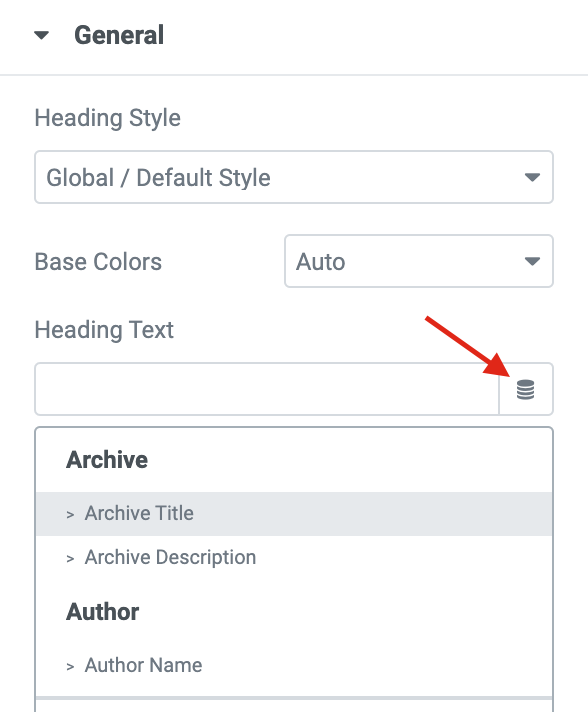
- Add a widget/block in Elementor such as Heading or Block Heading. We'll be using Block Heading below.
- Next to Heading Text you will find a database icon. Click on it.
- In the popup, under Archive, select Archive Title.
- Similarly, you can use Text block/widget and use Archive Description for its text.
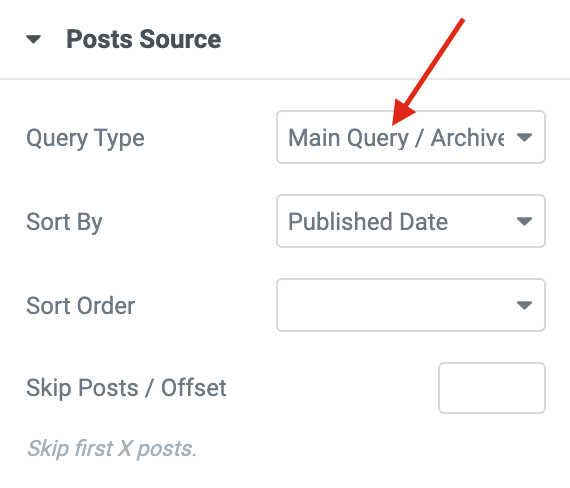
Blocks & Posts
You can add any of the blocks like in building the homepage. However, there's a slight distinction:
- Add any block of your choice.
- Under Posts Source, set Query Type to Main Query/Archives to show posts from the same archive that's being browsed.
- In case you want to show from global site, or from a different category/tag, surely you can use the Custom query type.
- You may also import any block or section from Smart Studio, but make sure if there's a section query, it's Query Type is set as above.
- Tip: If you add a block with 4 posts, then use the Offset feature under "Posts Source" to skip 4 posts from next block.
Adding Posts
Adding a new post is the same way as default WordPress installations, however, there are extra options that might need explaining.
Featured Image Size
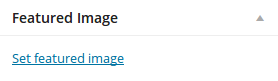
While the theme can function without featured images, it's highly recommended that you add a featured image to each post. This not only makes your site/blog more lively but also improves user experience.
To set the featured image, use the WordPress normal method.
Important If you have existing content and featured images, you will have to install Regenerate Thumbnails plugin and run it from Tools > Regen. Thumbnails. Skipping this will make your existing images look out of proportions or stretched.
Recommended Image Size
Image size (dimensions) will depend on what type of layout you're using throughout your WordPress installation or per individual post basis. This image will not only be used on the post, but also on the category listing pages.
- Compatible with full-width layouts: 1200px width minimum or 2400px to be fully sharp with high-res 2x devices like MacBook.
- If you don't use Full Width layout: 788px width minimum or 1576px to be sharp on 2x devices.
Note SmartMag uses WordPress's standard cropping and resizing method.
About Retina 2x Images
Retina images are used for hi-res / hight DPI screens such as iPad, Macbook Retina and so on. For these devices, you need to upload images double the minimum dimensions above.
Supported Post Formats
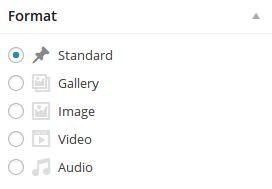
Video Format
Setup your post normally and set a featured image. Copy the embed code of the video from YouTube, Vimeo or any other site that gives you video embed codes. Paste the code in the "Featured Video Code" box.

Note Videos will be resized to fit the container so you can choose a larger embed format if the video site allows you to specify size/dimensions.
Gallery Format
SmartMag will automatically convert the first gallery inserted into a post to a gallery slider - granted "gallery" post format is checked. To use the gallery post format, same as every other post, set a featured image first.
- Click Add Media button.
- Click Create Gallery. Upload images or select from Media Library. Click Create a new gallery.
- Click "Insert gallery".
- (optional) If you wish to show thumbnails or create a static/non-slider gallery, set image captions and click Insert Gallery. Change post format to Standard.
Note To create a tiled mosaic gallery, Slim Jetpacks plugin is required.
Audio Format
WordPress supports embedding into posts by default. An audio player will be inserted into the post.
- Click Add Media button.
- Select your audio file. Once uploaded, make sure embed option is selected.
- Insert and Publish.
Image Format
Image format works very similar to a standard post. Just set a featured image of a recommend size and you're done.
Post Settings & Options
You will see the following post options when adding a post.
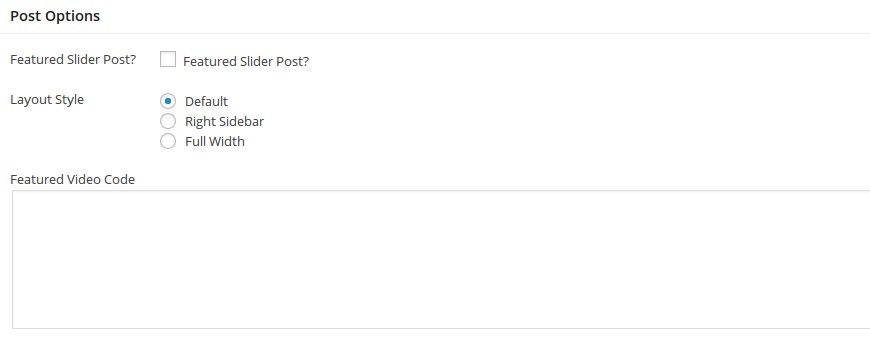
- Featured Slider Post? - Check this to feature this post in the homepage/category sliders.
- Layout Style: You have the option of a layout with a sidebar on right or a full-width layout for this post.
- Featured Video Code: As shown in the Video Format above, it's for setting a featured video for the post.
- Custom Background Image: Available when your layout is set to Boxed in Theme Settings. This allows you to change the background image of your site for only this post.
Reviews System
The review system is pretty self-explanatory. You only have to enable it for posts that are supposed to contain to be a review.
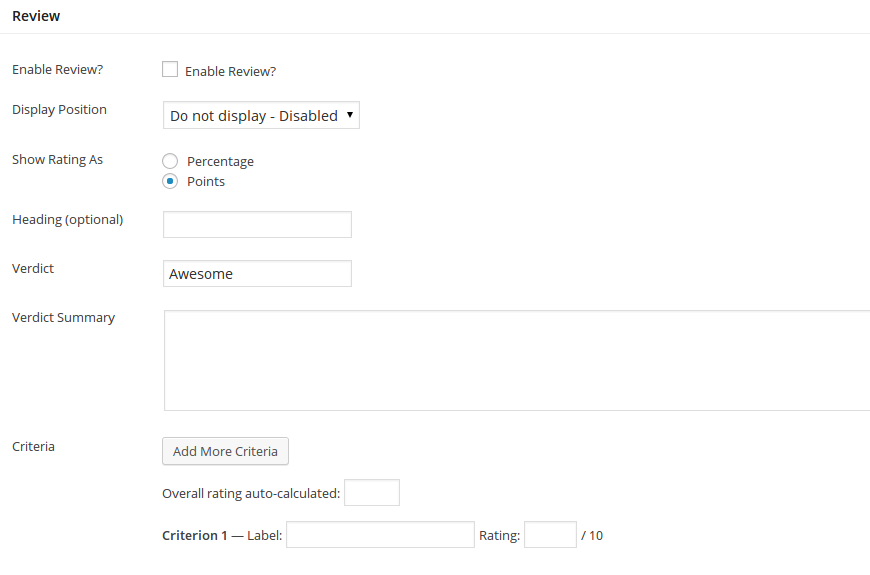
- Enable Review? - Check this to enable review box for this post.
- Display Position: You can either display the review box at top being full width, or at bottom full width.
- Rating Type: You can use either percent or percentage format to display rating in the box.
- Heading: A heading text can be set for the review box. If no heading text is provided, the review box header is hidden.
- Verdict: Enter one word for verdict, such as "Awesome".
- Verdict Summary: Enter a few line summary of the review. You can use advanced shortcodes here too.
- Criteria: Click on Add More Criteria and fill in the Label and Rating for each Criterion that follows.
Multi-page Content Slideshow
One of the unique features in v2.3+ is a multi-page content slideshow. It's basically <!--nextpage--> feature of WordPress with enhanced functionality.
If you are new to WordPress nextpage feature, the only thing to know is that you can place a <!--nextpage--> in Text editor anywhere to split to content into multiple pages - More info here.
Once you have created a multi-page post normally, you will have to enable the slideshow feature. Follow the steps below:
- Edit your post and look for Post Options.
- Next to Multi-page Content Slideshow? select either "AJAX - No Refresh" or "Multi-page" option (explanation below).
- Save your post. That's all. Your slidehow will be split based on
<!--nextpage-->.
Note It's recommended to check "Disable Featured?" for posts of this type.
AJAX or Multi-Page?
There are two options available. AJAX option prevents a page refresh so the content will be loaded via AJAX. This may be good or bad depending on your personal usage.
A site looking for more advertising views will want to use the Multi-page option to register more views. Whereas, a dynamic website wishing to make things faster for users will want to use the AJAX option.
Creating Pages
Creating pages is a simple process just like a default WordPress install. If you're unsure, learn more about pages.
If you're looking to build your homepage, head to Homepage Section.
Page Templates
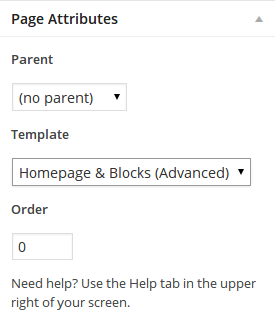
- Default: The default page has a container.
- Pagebuilder - No Paddings & Full Width: This is the recommended template for Page Builder, mainly to create Homepage.
- Pagebuilder: This is a template to be used with Page Builder when you need top and bottom paddings or when making a simpler Homepage with blocks on left and the Right sidebar.
- Authors List: Use this template to create a list of site authors.
- Legacy Templates: These only exist for backward compatibility. We don't recommend them anymore.
Add a Contact Page
Setting up a contact page requires that you install the "Contact Form 7" (go to Appearance > Install Plugins if you have not already installed it).
First create a contact form:
- Go to Contact and edit the default contact form (Contact Form 1).
- Edit the "Mail" settings to suit your needs and Save
- For more information, refer to Contact Form 7's FAQ and Docs.
- Go to Contact again and copy the code liste under Shortcode column.
- Go to Pages > Add New. Add your page content and paste the shortcode where you would like your contact form to appear.
Adding Google Maps to Contact Page
To add Google Maps:
- Go to Google Maps.
- Find the desired location and in the left pane, click Link icon (it's to the right side of "My places" button, next to print icon).
- Click customize and preview embedded map. Set settings as desired and the copy the HTML code.
- Edit your page and go to Text editor (next to Visual). Paste your code and Publish.
Custom Sidebars
Details in Sidebars & Widgets section.
Authors List
To create a page with the list of authors, simply create a normal page and use Authors List as Page Template.
Sidebars and Widgets
SmartMag comes equipped with several custom widgets but also styles many of the default widgets in several locations.
Custom Widgets
- SmartMag - About
- A widget to display an image/logo and a description of your site/blog. Recommended for footer.
- SmartMag - Flickr
- Display a configurable number of flickr photos from your account with configurable sorting options. Recommended for footer.
- SmartMag - Latest Posts
- Show posts in a small style. Defaults to latest posts but can use any of the query filters. Suitable for main sidebar and footer.
- SmartMag - Reviews (Basic)
- Just a pre-configured basic version of Latest Posts widget, with review posts filter pre-applied.
- SmartMag - Social Follow & Counters
- Show your social profiles with, optionally, followers count.
-
- SmartMag - Ads / Codes
- Add advertisement or any other 3rd party widget JS/HTML code. Advance features like different ad for AMP.
-
- SmartMag - Newsletter
- Show the newsletter subscription form, in several styles.
- "SmartMag Block" Widgets
- 3 of the the listing blocks suitable for sidebar or footer usage.
- "SmartMag Legacy" Widgets
- Older widgets for backward compatibility that we no longer recommend, but may still be used.
How to use widgets
- Go to Appearance > Widgets.
- Main Sidebar is the main right sidebar and Footer (3 widgets columns) is the large footer. Expand the box at right, where you would like to place your widget, by clicking on the arrow icon next to it.
- Drag & drop the widget you wish to use, in the expanded area below the box (Main Sidebar for example).
- Fill in the information necessary and click Save.
SmartMag Newsletter Widget - Mailchimp
The included subscribe form relies on Mailchimp - the industry standard for managing mailing lists. You can either manually send newsletters or use their RSS to Email guide to automatically send newsletters campaigns. But before that, you need to create an email list by integrating it to your blog subscribe form.
- First make sure you have configured MailChimp. Go to Configure Mailchimp section to configure it.
- Now simply add the SmartMag Newsletter widget to your Main Sidebar widget area.
- You may wish to modify the Subscribe Message for your audience.
- Save.
Sticky Sidebar
Sidebars are increasingly being used for prominent content but as the user scrolls, the sidebar goes out of the view. The solution is Sticky Sidebar.
Sticky sidebar makes your sidebar widgets always visible as the user scrolls, until they reach the footer. To activate:
- Go to Appearance > Customize > Main Layout & Sidebar.
- Ensure the Sticky Sidebar toggle is enabled.
- Publish.
Note: These settings do not apply to the Homepage. You have to enable the sticky sidebar in your homepage using Elementor. See this section to learn more.
Single Sticky Widget
What if you don't want your whole sidebar, but only the last widget to be always visible/sticky? The solution is a great lightweight plugin named Q2W3 Fixed Widget.
Once you have installed it, you have to configure it to work properly with SmartMag:
- Go to Appearance > Fixed Widget Options. Next to Screen Max Width, enter 1024.
- For Margin Bottom, enter 460 - this is your footer height. You may have to increase or decrease it based on your footer height.
- Save Changes.
Next, to make a widget sticky:
- Go to Appearance > Widgets. Click to expand your sidebar (for instance "Main Sidebar").
- Add your desired widget at lowest position. While adding, check the Fixed Widget checkbox.
- Save.
WARNING This only works for the last widget in a sidebar.
Custom Sidebars
SmartMag relies on Custom Sidebars plugin to offer this functionality. This means your sidebars will be safe even if you decide to switch the theme. It's recommended by the Theme to be installed but if you haven't installed it yet, install it from Appearance > Install Plugins (not visible if plugin already installed).
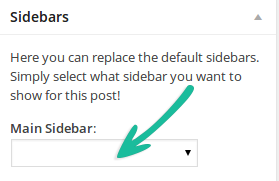
Go to Appearance > Widgets and Create a new sidebar.
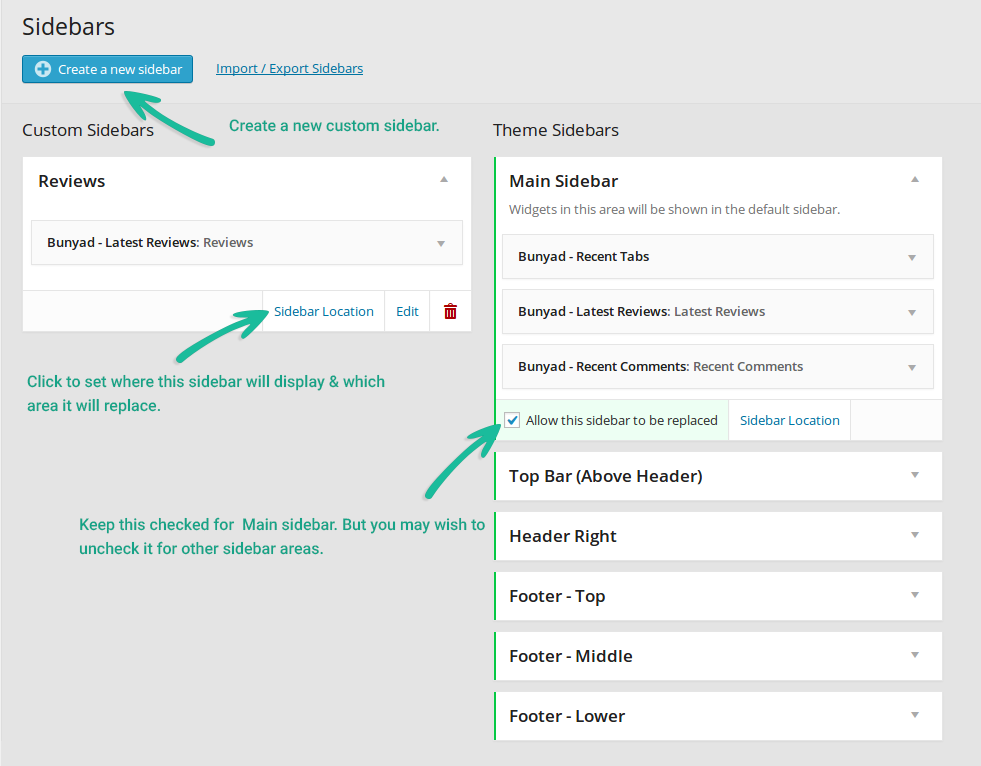
Next, simply add/edit a post or page and you should have a Sidebars box at the right side where you can select your sidebar from a drop-down list. Generally, you only want to replace Main Sidebar.
Using on categories, tags archives, search, and other archives
- Go to Appearance > Widgets. Click arrow to expand the sidebar you wish to use on a category.
- Click Sidebar Location link. You should see this:
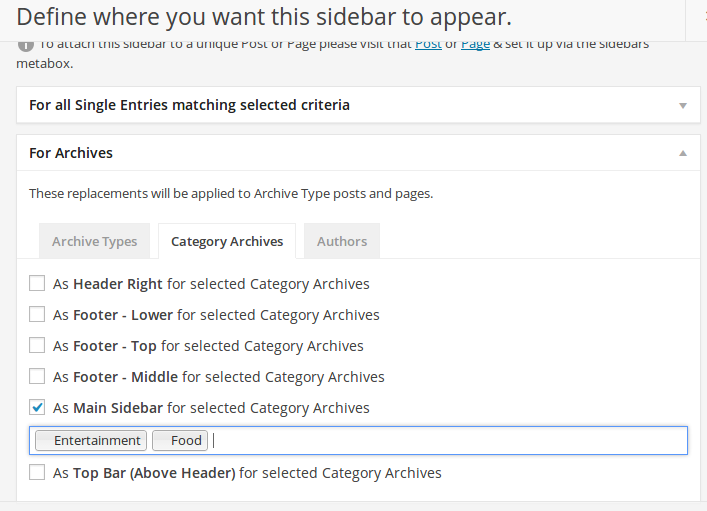
- Click to expand For Archives.
- For categories, click on Category Archive tab.
- For other archives like custom taxonomies, search, tag archives etc. click on Archive Types.
- Check "As Main Sidebar for selected"... and click on the input box to select your categories or archives types.
- Save Changes.
Social Followers Widget
The social followers widget is a simple drag/drop widget that's enabled when Sphere Core plugin is active. The widget name is SmartMag Social Follow.
To configure the social follow icons, head to Appearance > Customize > Social Follow & Count.
Note: Please note if you wish to use counters, automatic count isn't possible for all services. Instead, you can enter the count using the field Manual Count under the service settings. The webhost may be blocking the service or the service might be blocking the webhost and in those cases, manual count is also helpful.
Social Follower Counters
If you have enabled the followers counters, you will need to set up API keys for the following. Other services either work without API or require Manual Count.
Setting Numbers / Counters Manually
As not all services support automatic count, and sometimes the connection might be blocked by webhost or the service might block the webhost, you may have to use manual count instead. To set manual counters:
- Go to Appearance > Customize > Social Follow & Count.
- Click to expand a service settings, for example Twitter.
- On the screen, enter the number manually in the field Manual Count.
- Publish. You may have to refresh the page to see the results.
Twitter Social Counters
- Go to https://apps.twitter.com/app/new. Note that you will have to be logged into your relevant twitter account.
- Fill in the details name, description and website. And Create your Twitter application.
- Once the app is created, go to Keys and Access Tokens tab and copy the Consumer Key and Consumer Secret.
- Enter these details at Appearance > Customize > Social Follow & Count > Twitter.
YouTube Social Counters
- Go to https://console.developers.google.com/project and click Create Project (or browse an existing project).
- Once the project is created, under YouTube APIs, click YouTube Data API. Enable it from the next screen.
- After Enabling it, from left navigation, click Credentials.
- Click Create Credentials button and from the drop-down, choose API Key.
- Enter this API Key at Appearance > Customize > Social Follow & Count > YouTube.
Footer Setup
SmartMag comes with two types of footer options.
- Normal Footers: These are our default optimized footers, with a lot of customization options in Customizer.
- Footer Builder: Go even further in customization. Control every element, size, with unlimited flexibility using Elementor pagebuilder. Build your entire footer as you want it.
Normal Footers
SmartMag comes with footers that are split into two sections, the larger (upper) footer and the lower footer. Both are widget areas that can be modified as you wish.
Please ensure that you have already acquainted yourself with general widget setup via the sections above. This section assumes you already know how to add widgets to widget areas.
Upper Footer
By default, you're supposed to use 3 widgets in the footer. However, should you wish to go advanced, you may customize number of columns from Appearance > Customize > Footer Settings > General & Upper Footer.
The upper footer consist of of a Widget Area. To add widgets to it:
- Go to Appearance > Widgets
- Add three widgets to Footer Widgets area.
Lower Footer
Lower footer is best used for simple copyright message and links.
- Go to Appearance > Customize > Footer Settings > Lower Footer.
- Enter your Copyright Message.
- Save & Publish.
If you wish to achieve the demo look, adding links to the lower footer on the right side, you need to do two things.
- Create a menu.
- Go to Appearance > Menus > Manage Locations.
- Next to Footer Links, select your newly created menu.
- Save Changes.
Note Hierarchical menus are NOT supported. Only use menus of single depth. Footer is not a place for drop down menus.
Footer Builder: Custom Layouts
Using the footer builder, you can create footers for your entire site, or separate for archives/categories, posts, and home. Elementor knowledge is required, so if you haven't yet learned to use Elementor, read this.
1. Create a Custom Footer layout:
- Go to WordPress Admin dashboard and browse to SmartMag > Custom Layouts.
- Click on Add New button.
- In the popup, select type of template as Footer and enter any name for your footer layout.
- Click Create Template.
- Next, import a footer layout (or build one), and assign the layout to your site. (read below)
2. Import A Footer Layout
You can either import a pre-made custom footer layout or build one yourself (more on that below). To import, once you're in the Elementor Builder, you can follow these steps:
- On the right side, click on the red button titled Smart Studio.
-
In the popup, click Homepages & Layouts and select Footers from the left side.
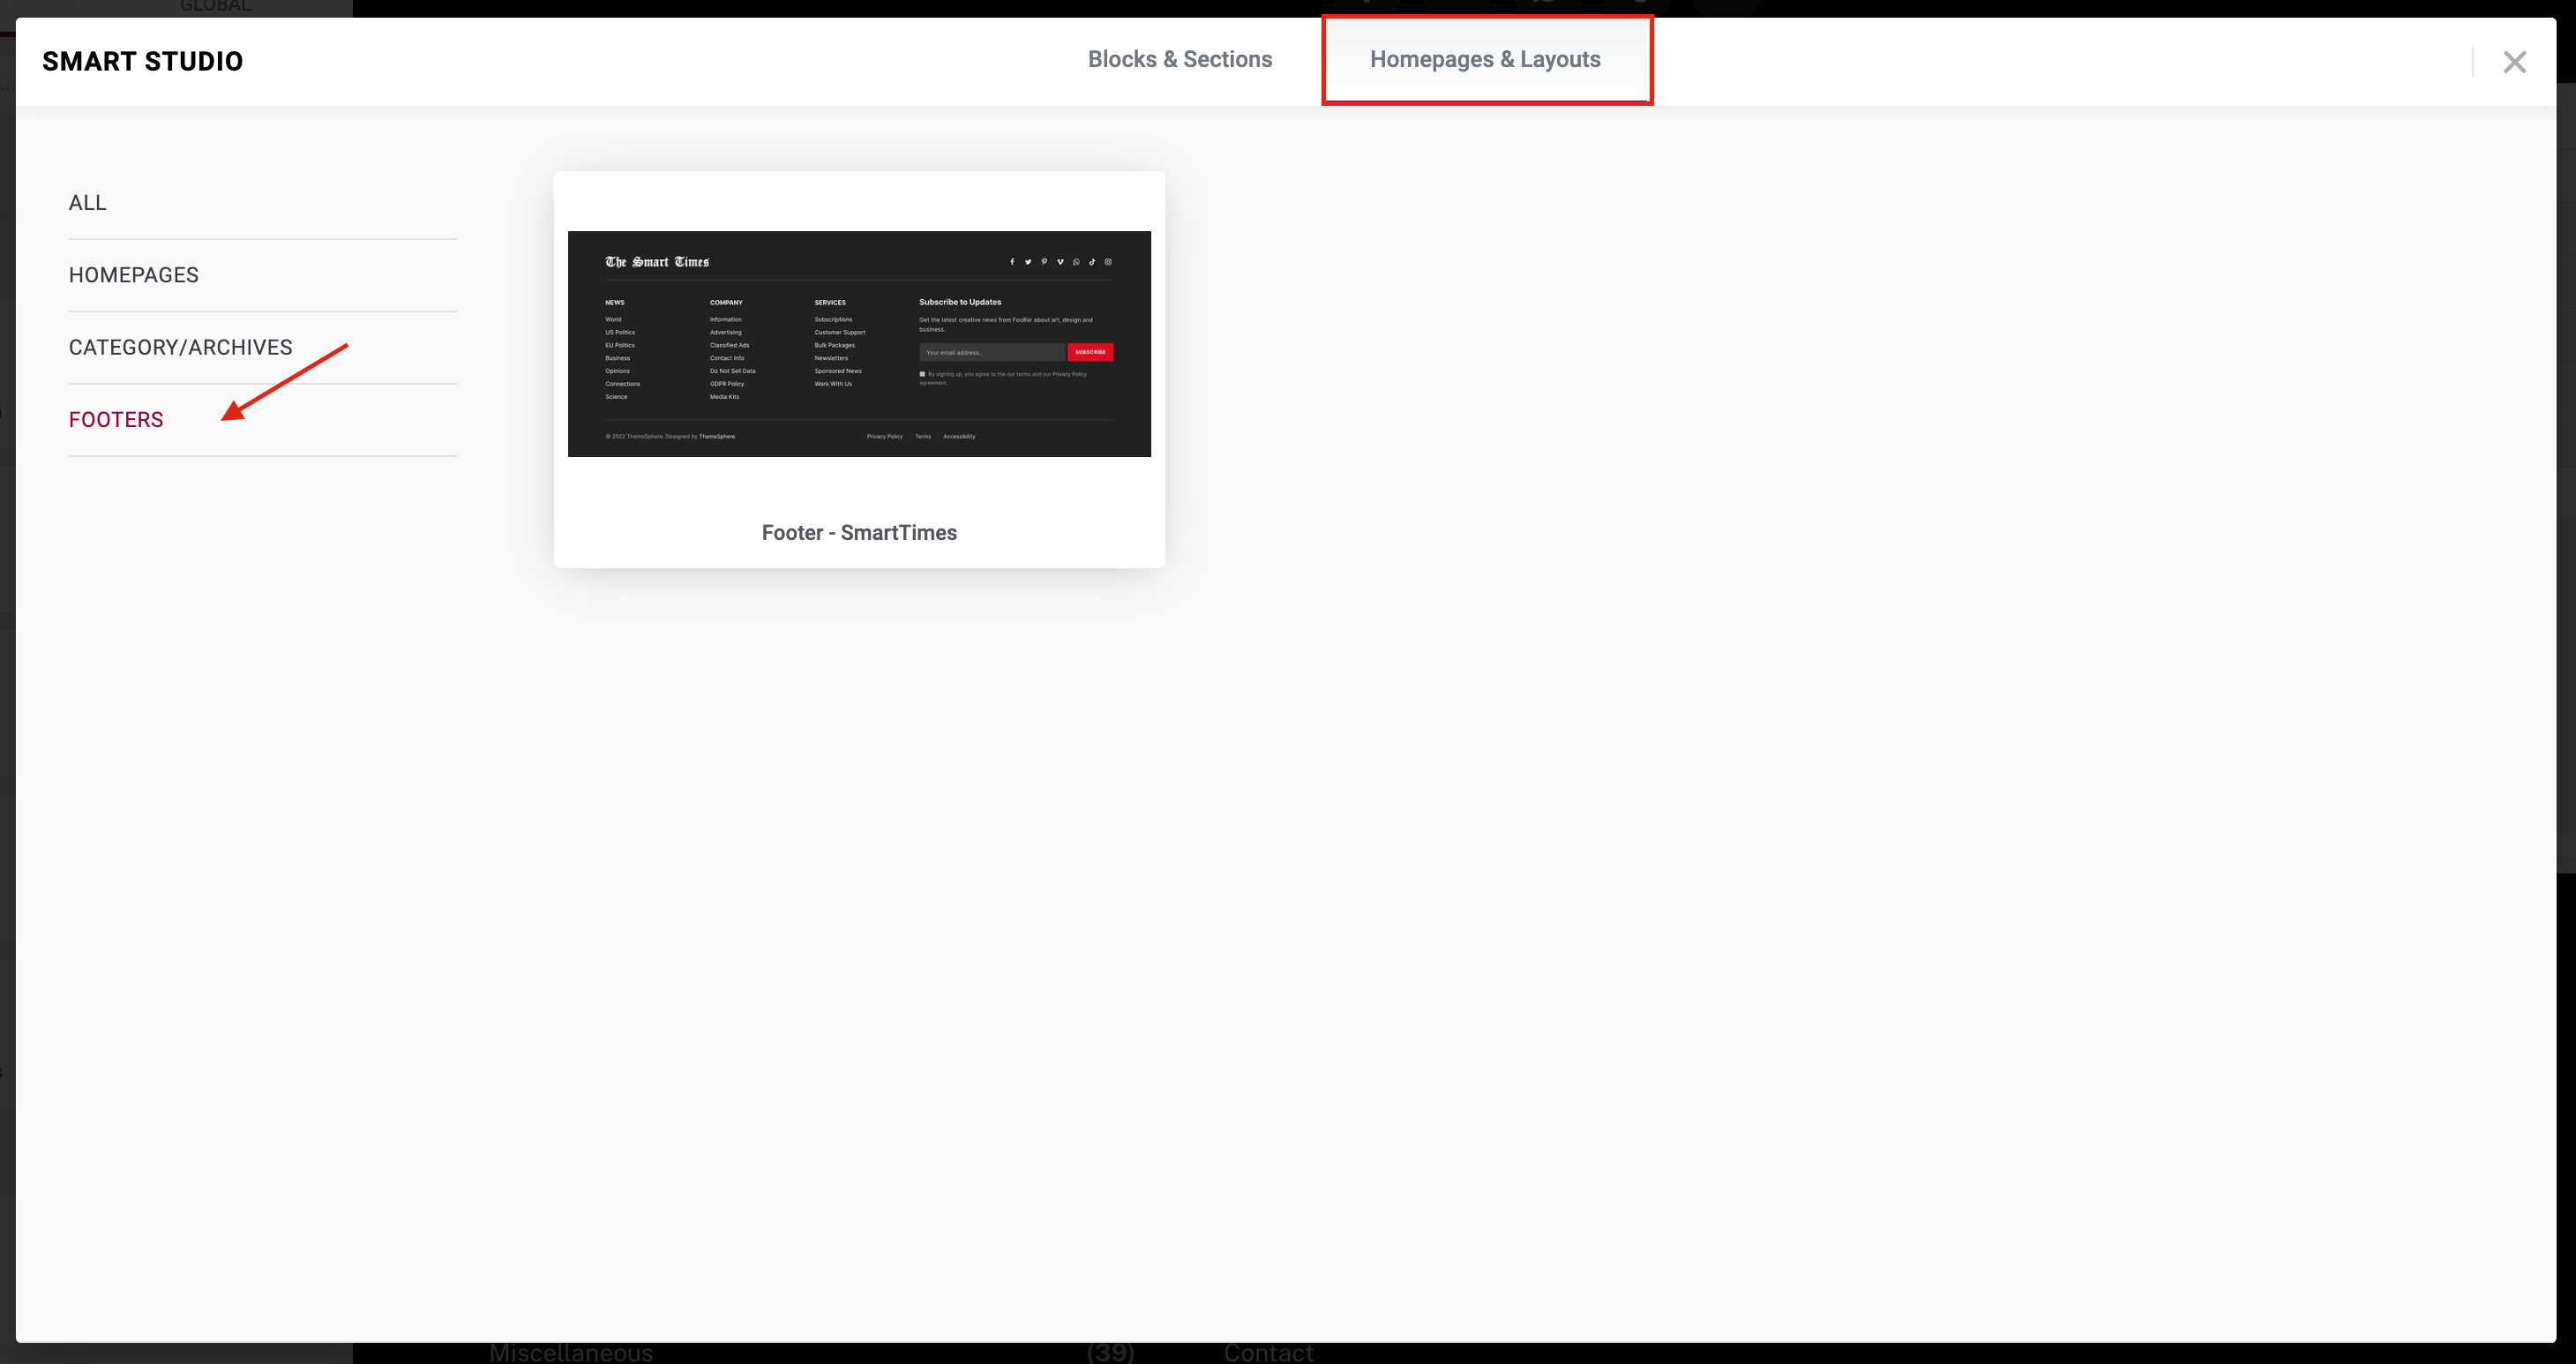
- Click on a layout. Next click on the Insert button.
- Hit the Elementor Publish button at bottom left.
3. Assign the Footer Layout
After setting up the layout, you have to assign it to either your whole site or a few locations.
To apply it globally to entire site:
- Go to Appearance > Customize > Footer Settings > Footer Layout & General..
- Next to Site Custom Footer select your newly created layout.
- Publish.
To use the custom footer layout only for a few site locations such as Homepage, Single Posts, Pages, or Archives:
- Go to Appearance > Customize > Footer Settings > Footer Layout & General..
- Toggle to enable Different Custom Layouts.
- Next to your desired location, such as Custom Footer: Archvies, select your newly created layout.
- Similarly, you may also assign it to other locations or even globally.
- Publish.
Advanced: Building Custom Layouts
This is the same as building normal layouts in Elementor, with a few distinctions detailed below.
Required Knowledge To use the footer builder, you must be familiar with using the Elementor page builder, that is also used to build the homepage. Please first learn the Elementor basics if you haven't already done so.
Mostly you will be using Elementor features such as Section, columns, divider and customize as necessary. However, you may also use any widget or any of the SmartMag blocks you may have used previously on your homepage.
And you can also use SmartMag blocks like Newsletter. Literally any widget or block you want.
Color, Style & Typography
Both the color/style and typography settings are located in Customizer.
Color & Style
Customizing the Colors & Backgrounds
- Go to Appearance > Customize > Color & Typography.
- Usually you may wish to only change Main Theme Color from General. This will effect several crucial areas of the theme and acts more like a skin.
- If the Main Color changes are not enough, adjust other colors as you please.
- You can also adjust logo padding from Header section.
- Several other color settings are within the specific sections in Customizer. For example, to modify Navigation colors, Headers & Nav section has relevant color settings.
- Save & Publish.
Typography
For typography, we use Google Web Fonts. It's usually best to leave the typography at default, but typography elements have suggested font families or fonts as alternatives.
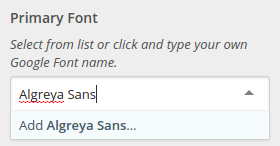
Additionally, even if you desired Google Font isn't in the list, you can click on Font fields and type the name of any font from Google Fonts directory. You will be presented with the option to Add and use that font as shown below.
- Go to Appearance > Customize > Typography > Fonts & Sizes.
- Select a font you like as the Primary Font, Heading Font etc.
- Experiment to get the best effect - the preview is updated instantly on the right.
- Save & Publish.
Using System Fonts
To use system fonts, you will have to go to Appearance > Customize > Colors & Typography > Global Typography and set the Primary and Secondary fonts to use one of the system fonts stack from the dropdown list (bottom of list).
Additionally, you will have to go through all the Customizer typography related settings under each section, where customized. For example, if a custom font was set for a block heading or Headings Font, you will have to change it to system fonts as well.
TypeKit/Adobe Fonts
We fully support TypeKit/Adobe Fonts. Using TypeKit is similar to using Google Fonts above, with a few more steps.
- Create your Adobe Fonts project by following this guide (Skip step relating to adding CSS code in head)
- Note your Project ID from the guide above. You can also find this ID under My Adobe Fonts > Web Projects. Copy this Project ID.
- Go to Appearance > Customize > Colors & Typography > Adobe Fonts / TypeKit.
- Paste your Adobe Fonts Project ID.
- Next, you will have to enter the desired font name in under the relevant Typography setting. Adobe font names usually have to be named in the following format:
brandon-grotesque. This is same as adding a custom Google Font name as explained here. - Save & Publish.
About Character Sets — Advanced
Non-latin script based languages will not display correctly when using the default fonts. This is because, to limit size, only latin charset is included by default.
To get the fonts to display correctly, you will have to tick the character sets for your language from Appearance > Customize > Typography > Advanced. Some latin-based languages required Latin Extended.
Performance & Speed Optimization
SmartMag is well optimized for general performance but there are several steps you can do to make it even faster:
Lazy Load Images
Lazy load is a built-in theme feature in SmartMag that loads images as the user scrolls on the home, category listings, archives etc. - basically images are loaded as needed. This saves bandwidth and speeds up the first load. To enable Lazy Load:
- Go to Appearance > Customize > Performance.
- Tick LazyLoad Images.
- If you use Instagram widget or have sidebar widgets with large images, also tick Aggressive Lazy Load.
- Save.
Optimize Images
There are countless great options to optimize images for WordPress. You can refer to this comparison article for the options. Some premium plugins like ShortPixel offer a generous free quota per month as well.
If you want to go even more advanced, we recommend using WebP Express plugin. WebP is the latest technology that offers lowest size at same quality. However, it doesn't work with Cloudflare and some other CDN providers.
Intermediate: Use A Cache Plugin
We recommend using W3 Total Cache for your caching needs. If you know how to use a cache plugin, you may use any like WP Super Cache or WPRocket etc.
Not For Beginners Don't add a caching unless you have some WordPress experience.
- Install and activate the plugin W3 Total Cache.
- Go to Performance > General Settings.
Next to Page Cache: tick Enable and set page cache method to Disk: Enhanced.
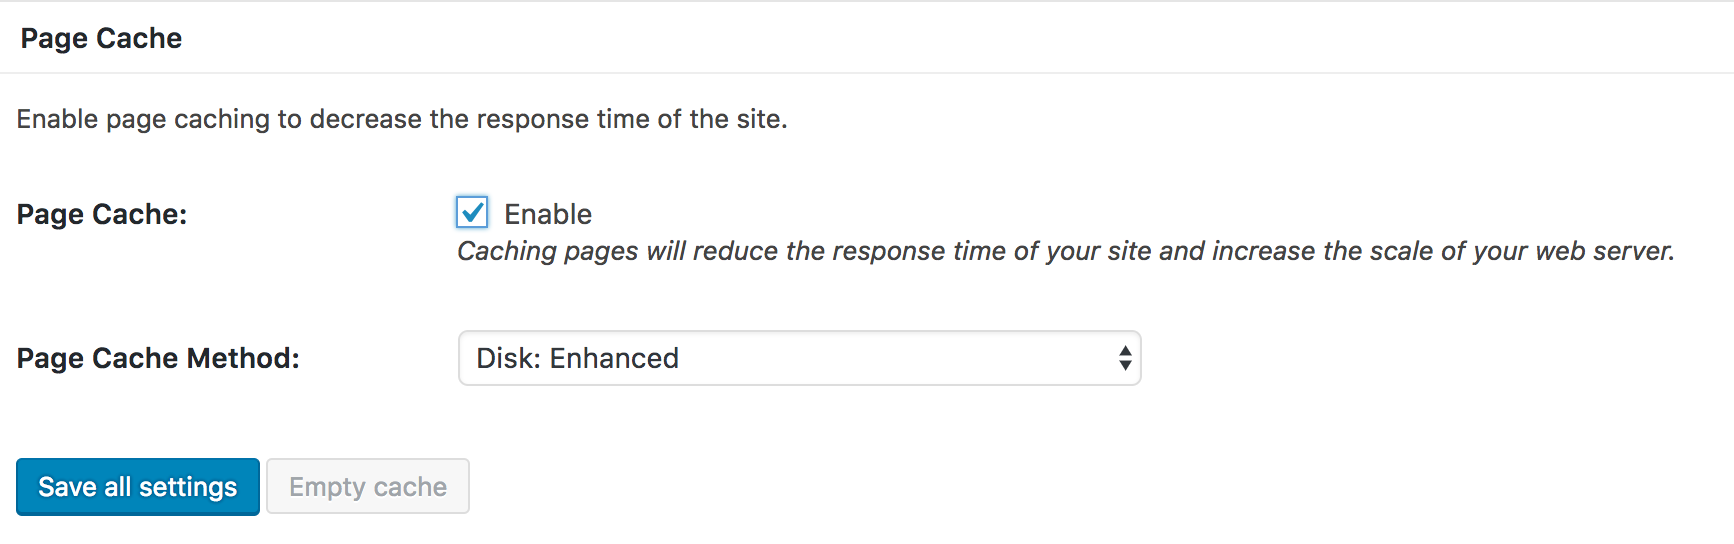
Next to Browser Cache: tick Enable.

- Click Save All Settings.
-
Go to Performance > Browser Cache and ensure Set expires header, Set Last-Modified header and Enable HTTP (gzip) compression are ticked.
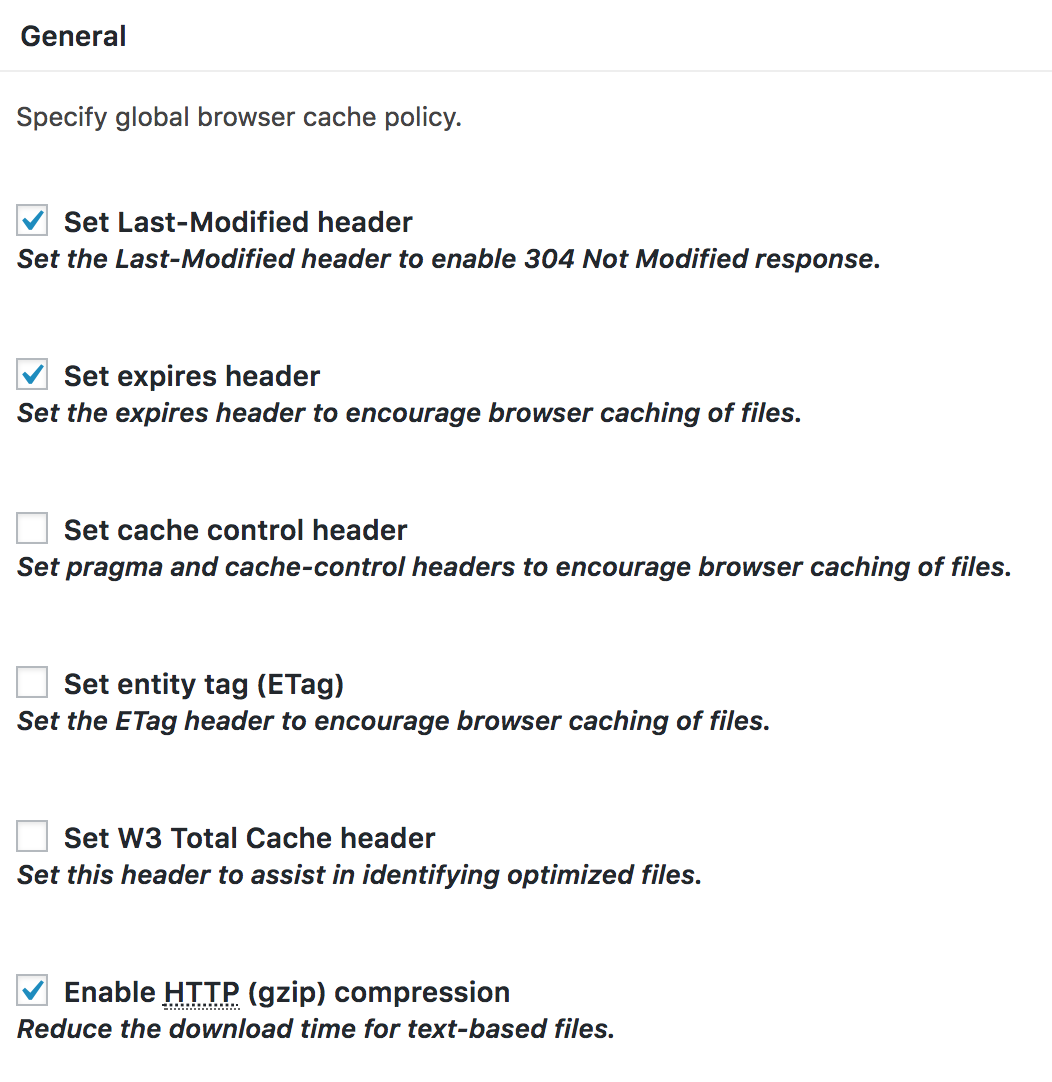
- Click Save All Settings.
Debloat: Minifiy & Improve CSS/JS Delivery
One biggest performance gains, after cache plugin, can come from improving CSS and JS delivery. We have well-tested, custom-made tight integration with Debloat plugin.
- Install the plugin Debloat from SmartMag > Install Plugins.
- Go to Settings > Debloat: Optimize.
- Now optimize CSS and JS as explained below.
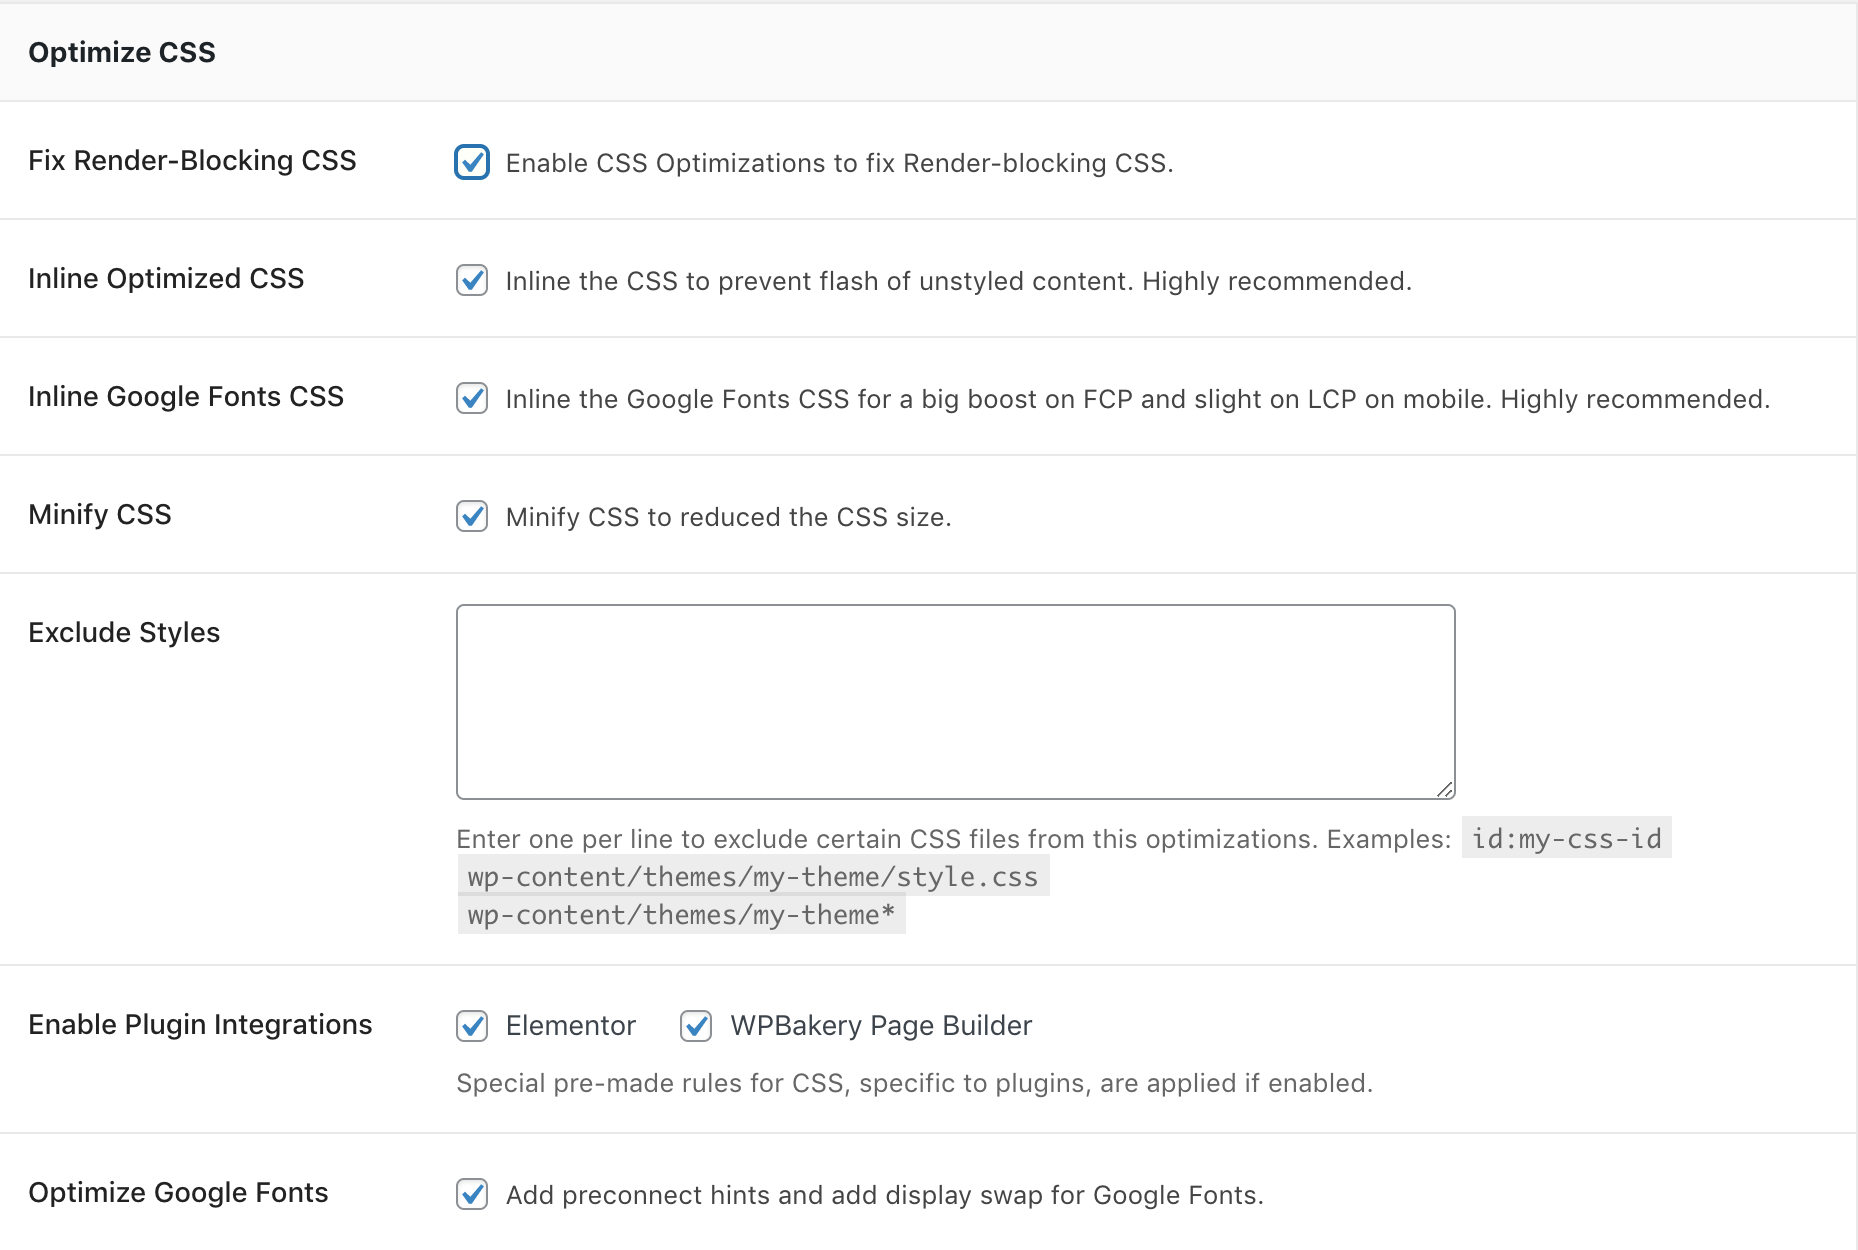
1. Optimize CSS
On the main settings under Optimize CSS tab, we suggest enabling all the optimizations.
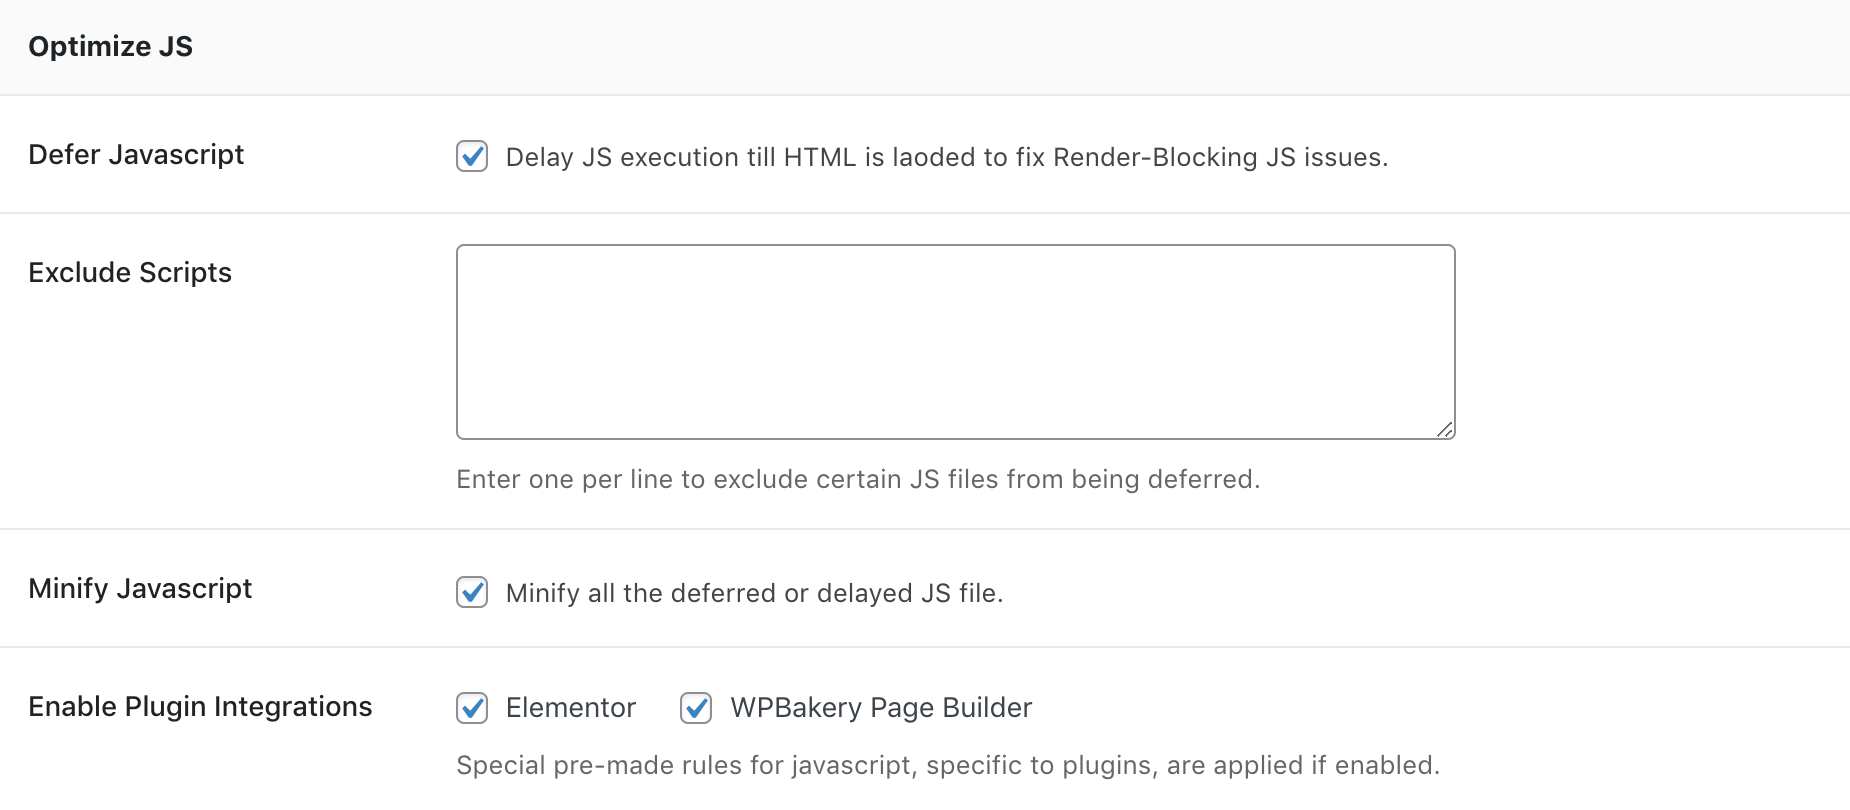
2. Optimize JS
Click on the Optimize JS next and enable all settings under Optimize JS. Tick Defer Javascript and other settings will enable.
3. Delay Load JS
Under delay load section, tick to enable Delay Javascript. Rest of defaults should be auto-enabled.
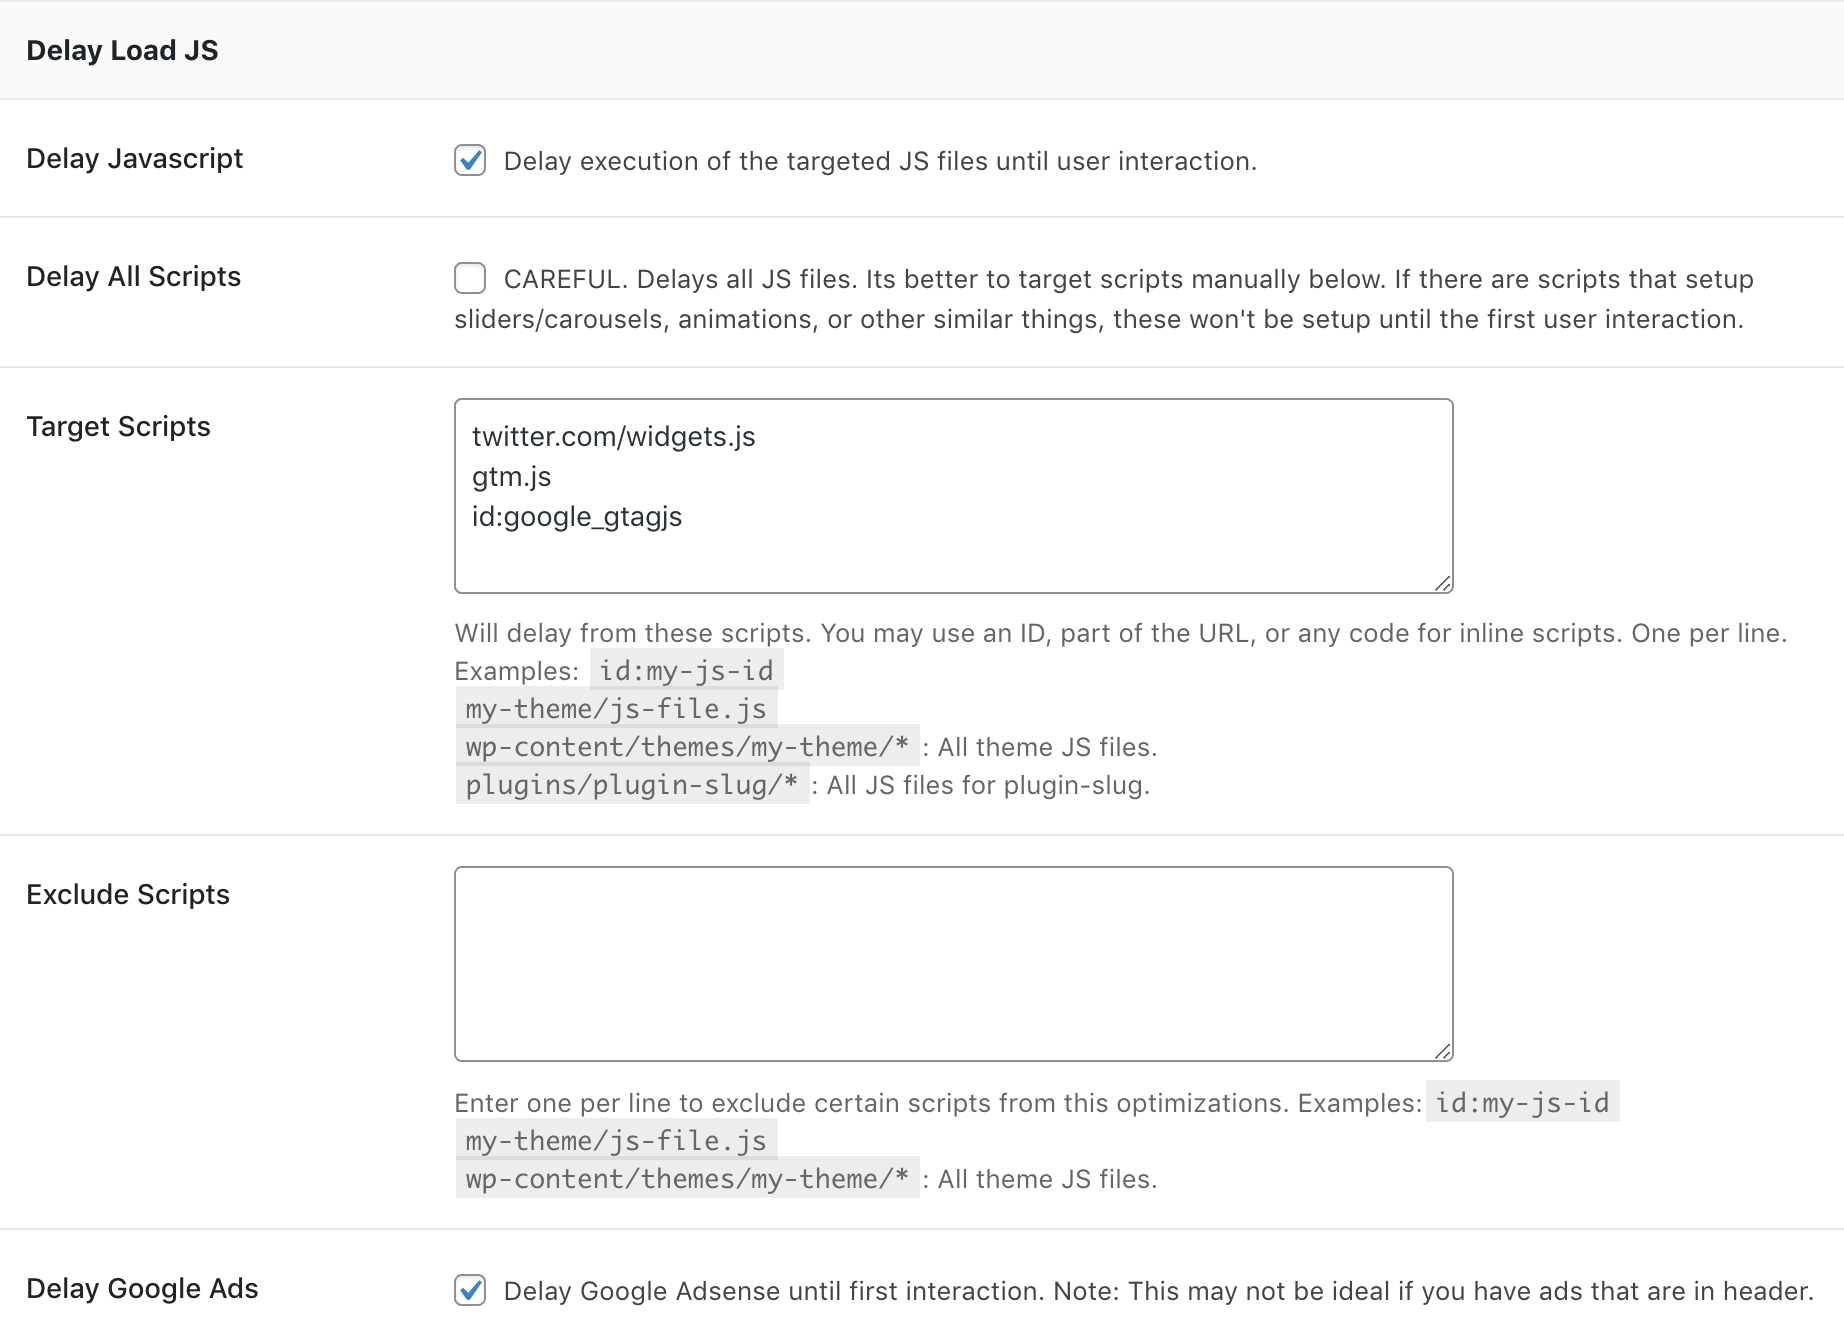
Third Party Services
If you use a lot of third party services, you will have to add them to delay load as they can cause a lot of delay. For each of the service below that you do use, copy the code and paste it (one per line) in Target Scripts field.
Note Google Adsense will be delayed load by default. A few others like twitter widget are also delayed by default.
- Facebook Chat:
facebook-jssdk - New Google Analytics (or Google Tag Manager):
googletagmanager.com - Old Google Analytics (or Google Tag Manager):
gtag.jsORanalytics.js
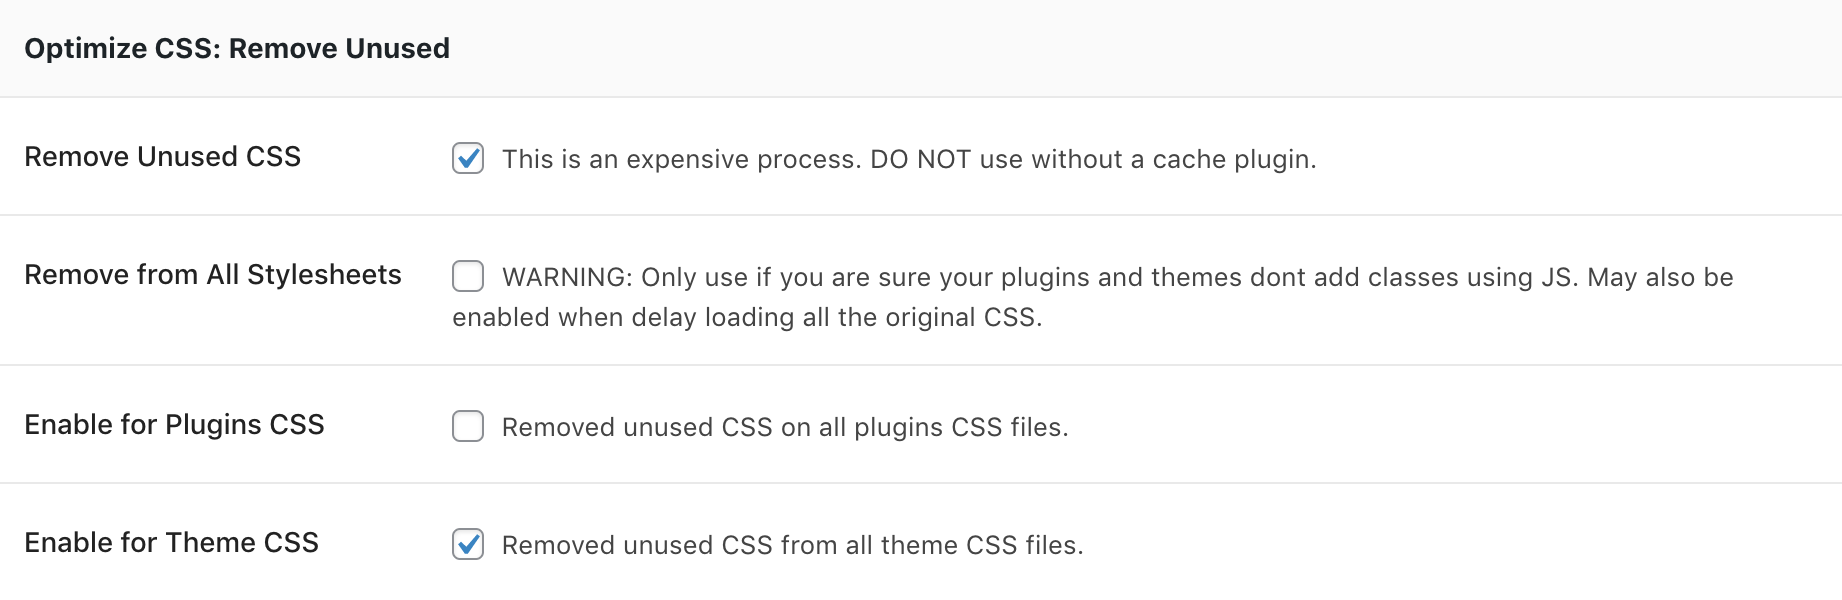
4. Remove Unused CSS
This is an advanced feature yet due to our custom integration with SmartMag, the theme's unused CSS removal will be simple enough. All you have to do is enable it as follows. Tick Remove Unused CSS and Enable for Theme CSS.
WARNING Do not enable this if you don't have a cache plugin.
This should be generally trouble-free. If you use a Child theme with Custom CSS that's causing issues, you can exclude it next to Exclude Stylesheets like this:
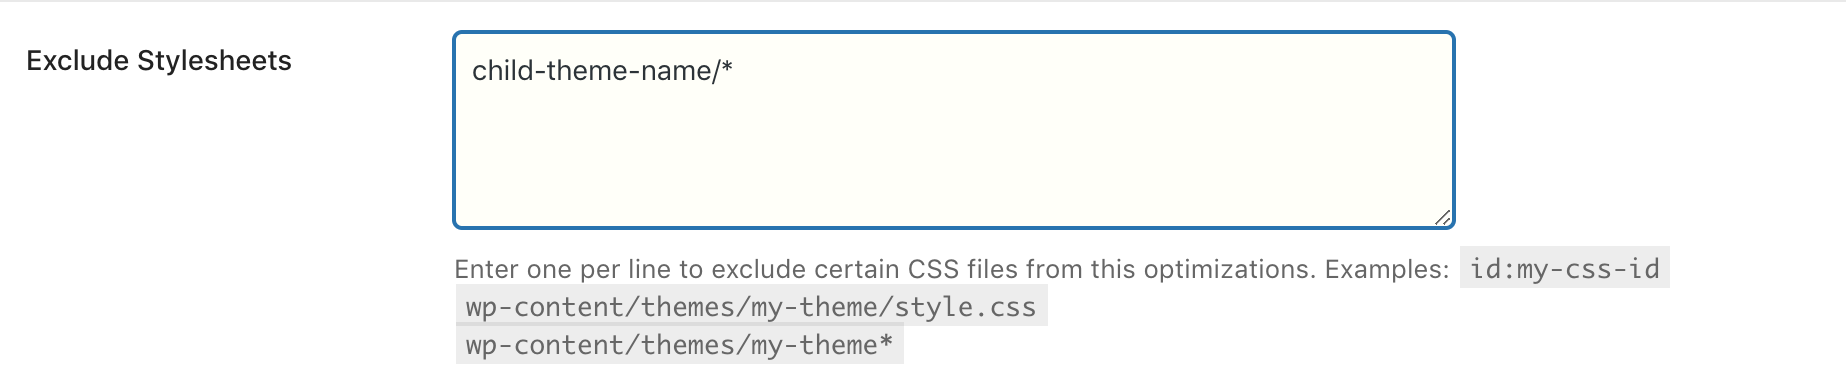
5. ADVANCED: Further Unused CSS
Note There usually is little benefit from removing too much of CSS unless you have really bad plugins doing hundreds of KBs of CSS. So this is usually unnecessary. It's better to focus on other optimizations.
If you're an advance user with some CSS / dev tools knowledge, looking for that extra snappiness, you can enable Remove CSS feature for your plugins, or even everything.
But keep this in mind: For anything dynamic created using Javascript, the CSS will be missing. You will have to find out correct classes and add them to Always Keep Selectors or Conditionally Keep Selectors features.
Finally, there's also a way to load all of the original CSS with a delay using the Delay load Original CSS feature. This will speed up initial render and load rest of the CSS before user starts interacting with the page. Using this method, precise effort of using Keep Selector feature can be avoided.
(Old/Alternate Plugin) Autoptimize for CSS/JS Delivery
WARNING We recommend Debloat plugin instead explained above. This is for Advanced users only. DO NOT use both plugins.
Minification and merging of all the assets of WordPress, plugins and theme can improve delivery of data by reducing size, improving compression, and sending all the data in one request instead of multple ones. You will need a free plugin named Autoptimize for this.
- Install the plugin Autoptimize from Plugins > Add New.
- Go to Settings > Autoptimize.
- For older versions of Autoptimize: Click the Show Advanced Settings button at top right.

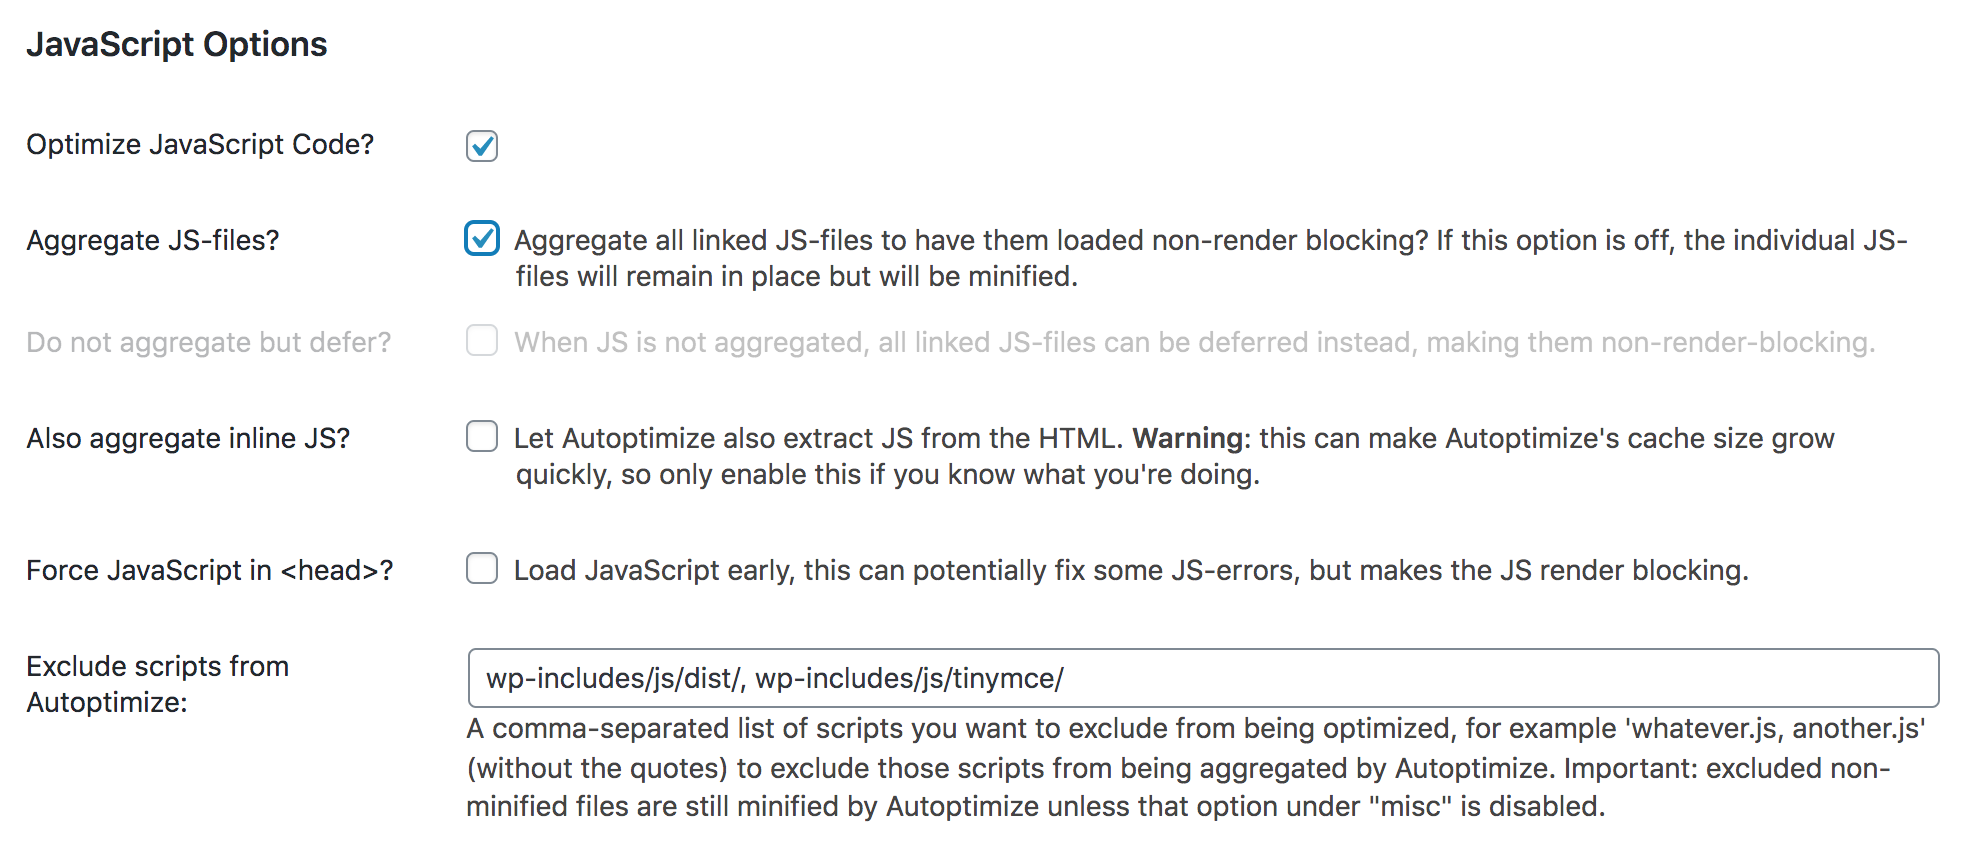
- Under Javascript Options, tick Optimize Javascript Code and configure as shown in image below.
For max performance, you can remove all scripts under "Exclude scripts from Autoptimize:" but this might break some plugins - only enable it after everything else is tested.
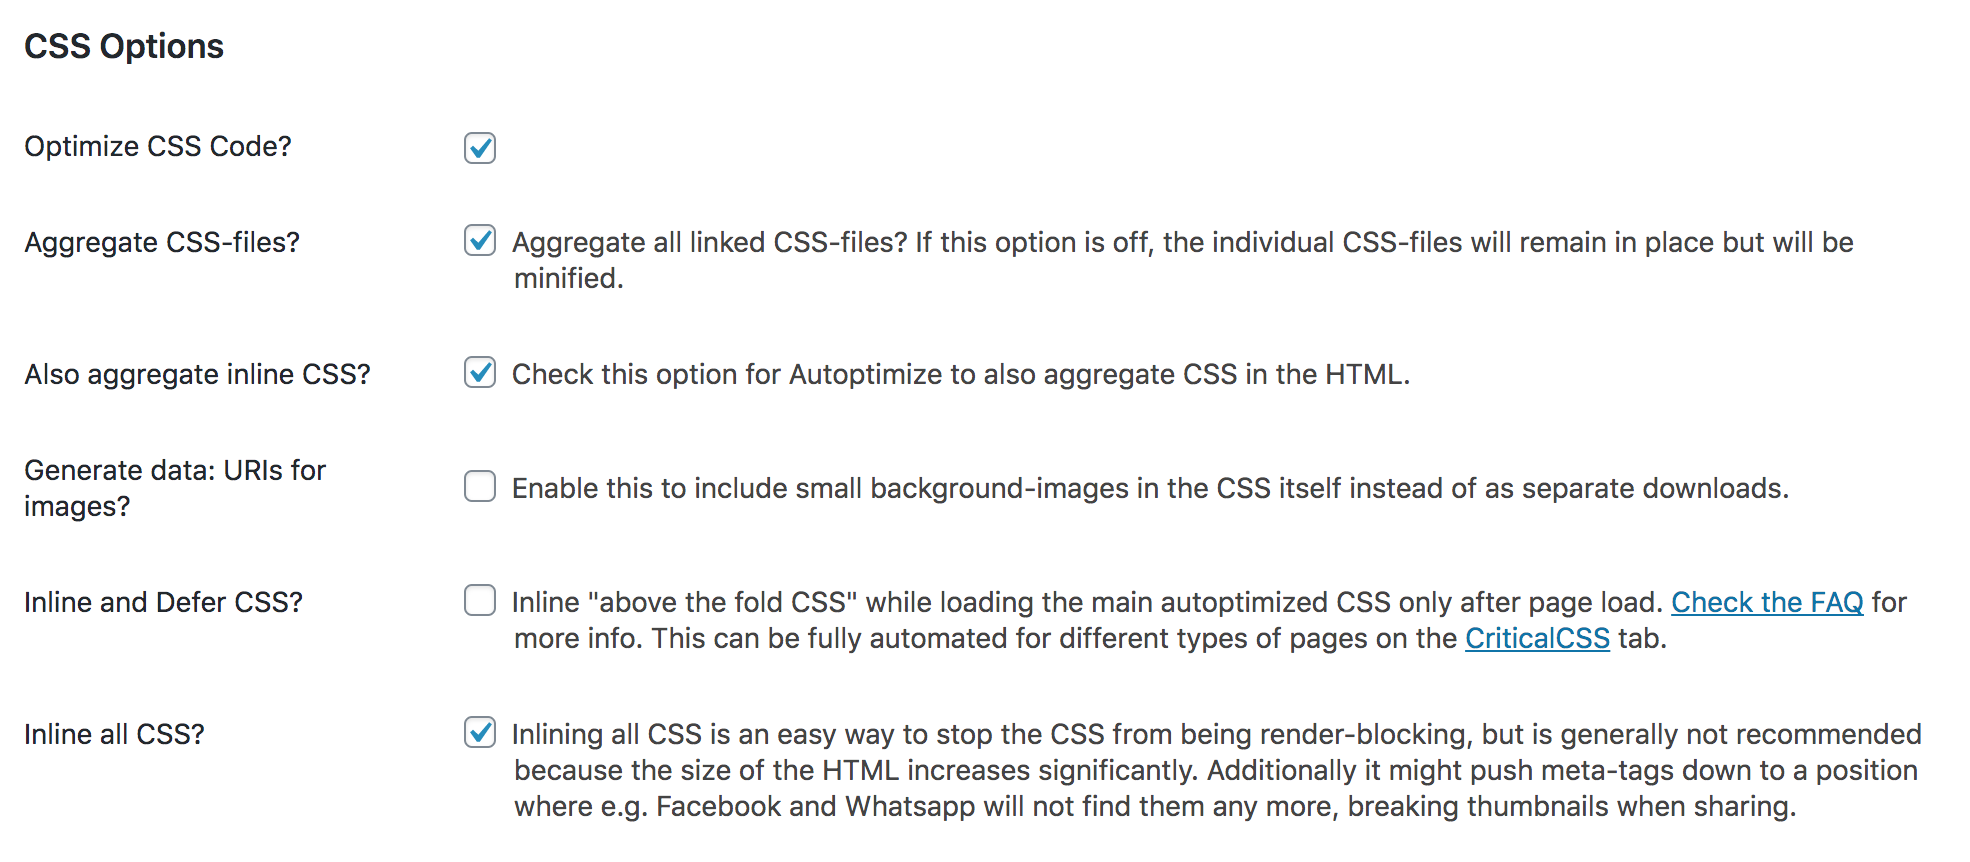
- Under CSS Options, tick Optimize CSS Code.
For max performance, tick all the settings as below including: Aggregate CSS-files, Aggregate Inline CSS, and Inline all CSS.
- Click Save Changes and Empty Cache button.
Advanced: Disable Elementor Assets
SmartMag demos, by default, don't need many of the assets Elementor loads. Unless you're using some of the built-in Elementor widgets, these can be safely disabled.
Frontend JS will be needed for some of non-SmartMag Elementor blocks that use video APIs, lightbox, or custom sliders. Some like Swiper may also need the frontend modules.
Animations assets are only needed if you use Advanced "Motion Effect" in Elementor for a widget or section.
Share Links is only necessary for the non-recommended Elementor social block.
- Go to Appearance > Customize > Performance.
- Tick all the assets under Disable Elementor Assets that you don't use.
- Publish and clear caches.
WooCommerce & Setup
Note This section assumes you already have WooCommerce Plugin activated. If you do not yet know how to use WooCommerce, please use WooCommerce's Documentation to familiarize yourself.
Sample Content
SmartMag uses the WooCommerce's default sample content. Follow the official WooCommerce Dummy Data guide.
Please note, on demo, for the Shop Sidebar example, we're using a custom sidebar with two widgets: WooCommerce Price Filter, and WooCommerce Top Rated Products.
The Default Shop Pages
SmartMag fully uses WooCommerce's internal pages. When WooCommerce is activated, it will create Shop, Cart, Checkout and My Account pages. These are normal WordPress pages that you can edit just like any other page.
Sidebar and Layout Settings
By default, the WooCommerce integration will have right sidebar for the shop page and full width for other pages like cart, product etc.
Sidebar for Shop Page
- Go to WordPress Admin > Pages and edit your Shop page. If you're not sure what's your shop page, go to WooCommerce > Settings > Products and you will find the shop page name next to Shop page.
» More info on WC pages - Once on edit page screen, under Page Options, you can set your desired Layout Type to full width or have a sidebar.
- Save the page
Change Sidebar for Pages
This feature requires SmartMag v5.4 or later.
- Go to Appearance > Customize > WooCommerce/Shop.
- Select Right Sidebar setting under "Pages Sidebar".
- Publish.
Adding Sidebar Widgets
A special widget area Shop Sidebar is used for WooCommerce, when a sidebar is enabled.
- Go to Appearance > Widgets.
- Add widgets to the sidebar/widget area named Shop Sidebar.
Change Layout for Selective WooCommerce Pages
Sometimes you may wish to disable the sidebar for only some pages, such as the "Checkout" page. You can disable the sidebar selectively for pages.
- Go to Pages > All Pages. Locate and edit one of the WooCommerce shop page such as Shop, Cart, Checkout or My Account.
- Edit the page normally and under Page Options box, next to Layout Style, select Full Width.
- Save your page.
Tip The page named "Shop" is used for all product listings so you may change its sidebar settings to affect all product listing pages/archives.
bbPress & Setup
SmartMag can be used with bbPress with fully compatibility offered since version 1.5.
Note This section assumes you already have bbPress Forum Plugin activated.
Adding Categories & Forums
SmartMag's default bbPress layout is based on traditional forum hierarchy. You need to create categories and forums.
Create categories:
- Go to Forums > New Forum.
- Enter the required info and on the right side, under Forum Attributes, select Category next to "Type".
- Publish.
Create forums:
- Go to Forums > New Forum.
- Enter the required info and on the right side, under Forum Attributes, next to Parent, select the category you created in the instructions above.
- Publish.
Login Widget for Sidebar
Please make sure to sure (bbPress) SmartMag Login Widget for the sidebar. There's another widget with a similar name. Make sure the one you use has the name SmartMag in it.
About AMP & Setting Up
If you're considering activating AMP on your site, make sure you're aware of the pros and cons of doing so. Google AMP can help your articles get better ranking but there are also drawbacks.
With Google AMP, your site is served through a Google's CDN under their frame. And it's a limited tech meaning it doesn't support Javascript so a lot of your plugins will not be available in AMP mode. Check our these articles to learn more:
Search Engine Journal: Does Your Website Need Accelerated Mobile Pages (AMP)?
Moz: Should you AMP-lify your site?
About Bunyad AMP Plugin
We have done our best to make SmartMag fully compatible with AMP. Our Bunyad AMP plugin is based on AMP for WordPress plugin (joint effort by Automattic and Google Engineers), with our unique features to preserve all your site's original branding - logo, colors, look and feel - even in the AMP mode.
As with all AMP plugins, there are a few basic requirements to keep in mind. First, you need a good quality webhosting provider and setup a proper cache plugin.
You also have to know that any illegal Javascript code from 3rd party plugins like a slider or gallery plugin, will be removed from AMP mode. The AMP technology does not allow Javascript.
Setting Up Bunyad AMP
Bunyad AMP with SmartMag does not require any configuration. All you have to do is install and activate it.
- Go to SmartMag > Install Plugins. Under Optional / Advanced plugins, you will find Bunyad AMP.
- Click Install (or Activate).
- Visit a post/article from your site and you should notice the View AMP link in the admin bar. Or you can simply add
?ampto any URL to access its AMP version. - Once you have verified it works, verify that it's validating. Visit the Google AMP validator and enter the URL from previous step.
- If the validation fails, read below.
- For any shortcode provided by a plugin that's used in a post, try the validation process on that post.
- Important Using a cache plugin when AMP is enabled isn't optional. Using AMP without a cache plugin will not provide the speed benefits AMP offers and will only hurt your performance. Please refer to our performance guide and setup a cache plugin.
Failed Validation
If the validation fails, go through the following troubleshooting steps:
- Go to Plugins and temporarily deactivate all plugins other than these: Bunyad AMP, Sphere Core, SmartMag Core, Elementor.
- Since cache will interfere with the process, make sure to disable any cache plugin or webhost provided cache feature (or empty cache on each attempt).
- Try the validation again. If it succeeds, start enabling your plugins again until you find the offender.
- Any code you have pasted into a Widget, or inserted via some other means can also cause conflict. Try to find and temporarily remove such code(s) and try again.
Once you have identified a problem plugin, you will either have to find an alternative or contact the developer of the plugin. Unfortunately, in some cases, it's simply not possible for plugins to be AMP compatible due to limitations imposed by AMP technology (such as no Javascript allowed).
About Cache Plugins
Most popular cache plugins will cache the AMP just fine. However, a few cache plugins may not cache AMP when using the default URL scheme. To workaround this:
- Go to AMP > Settings. Click to expand Paired URL Structure.
- Click on
Path suffix: /amp/option. - Save Settings and Clear Caches.
Post Views Count & Sort
Sphere Post Views plugin is our custom optimized views counter plugin that has many performance features built-in to work well for many traffic needs.
Activating this plugin will allow you to show post views count in post meta and will enable sorting features on homepage blocks and widgets.
Alternatively, you may also use Jetpack plugin for sorting posts only (no view counts).
Setting Up Sphere Post Views
First install the plugin and then enable it in post meta to show view counts.
- Go to SmartMag > Install Plugins. Under Optional / Advanced plugins, you will find Sphere Post Views.
- Click Install (or Activate).
- Go to Appearance > Customize > Global Posts Settings and tick Views Count where appropriate and drag/drop to reorder if necessary.
- Not all blocks will respect the above, so you may have to edit your Homepage and do it per-block in Elementor.
- To enable for Single Posts, go Customize > Single Post Page > General & Post Style > Post Meta and tick Views Count under Items Below.
- You may additionally want to check performance and other settings from Customize > Sphere Post Views
- Important If your traffic is medium to high, read performance details below.
Sort by Post Views for Popular: All time, Last 30, or Custom Days
Once the plugin is enabled, there will be additional sorting options available in widgets and homepage blocks in Elementor.
To use in Homepage blocks:
- Edit your homepage with Elementor and add/edit the block you wish to use the Sorting by Views Count for.
- Expand Post Sources in the left panel and you will find new Sorting options in the Sort By dropdown.

- Sorting can be done by all time post views, or those counted in the last 30 days or custom number of days. This can be used to show popular posts of last 30 days for example.
- Save the block and homepage.
Performance and Server Load
We use AJAX to update the post views, in a non-render-blocking manner so it's compatible with cache plugins. However, like any other post views plugin, this is going to obviously do a server request and update the database on each request.
If your server isn't very powerful, this can be slow or even cause server load on a medium or high traffic site. We have several unique performance features exclusive to Sphere Post Views.
Alternative Endpoint is something that should be considered on all sites. Batch Update and Data Sampling may be considered for medium to high traffic sites.
Performance: Alternative Endpoint
This feature available in Customize > Sphere Post Views, when enabled, will use an alternate endpoint that's lighter than WordPress core AJAX.
Enabling this feature will normally reduce server load decently, however, it will not work on all webhosts. So make sure to use the test link to confirm it works.
We recommend always enabling this feature, even for small sites, if it works with your webhost.
Performance: Batch Update (Advanced)
Another great performance feature to decrease the load is to not to write to database on each hit. Instead, this feature can collect all views in memory and write to database only once 120 seconds have passed.
However, this feature has some server-side requirements:
- An in-memory storage is required like Redis or Memcached. You will have to check with your webhost if either of these is available.
- Next, you require a plugin to make them work with WordPress. For Redis, there's Redis Object Cache and for Memcached the Memcached Object Cache plugin.
- Finally enable the Batch Updates from Customize > Sphere Post Views.
Performance: Data Sampling
For high traffic sites, a powerful server and alternate endpoint might not be enough. Only a subset of traffic will track views, but with a mathematical formula, we can estimate the views very closely to real when the traffic is high.
Small or medium traffic sites need not use this feature. It's only for high traffic sites.
As with above features, this is enabled from Customize > Sphere Post Views and additionally, a sampling rate has to be configured.
How does Sampling Work
On every visit to a post, the plugin will generate random number between 1 and SAMPLE_RATE. If the random number turns out to be 1 then the views count of that post will be incremented by N.
In theory it should take N tries to hit number 1 (the probability of that is 1/N). In the long run it'll increase the views count value by 1 for each visit without constantly hitting the server.
The views may appear incorrect momentarily, but they eventually depict a fairly accurate number.
Suggested Sampling Rate
A sampling rate of 5-25 appropriate for 10-50k visits per day. For a site receiving about 100k, we'd suggest 40-50. And 100 would be a good number for 200-300k visits per day. Any site receiving lower traffic than 10k visits per day, generally doesn't need to use sampling.
Using a Lower number will mean more accuracy, but the server load will increase considerably.
Performance: Log Expiry Days
By default we store every post view your site gets in a database table and it can grow quite a bit over time, especially on high traffic sites.
These logs are retained for 180 days by default but if all you need to is to sort by last 7 days, then you may not need that many days of logs data.
You can change this default by going to Customize > Sphere Post Views and changing the Log Expiry Days to the desired number.
Note: After enabling this, data older than the entered days will be deleted every day around midnight. This will only delete views data related to sorting within time ranges (for example last 24 hours, last 7 days, etc.). The total views count won't be affected in any way.
Translation & Internationalization
SmartMag comes with .po/.pot file included under the smart-mag/languages folder. The front-end strings are in bunyad.pot file. While the back-end strings are in bunyad-admin.pot. To translate front-end:
Easy Method You may use the Loco Translate plugin instead for an easy GUI translation instead of using PoEdit. Or you can use the WordPress default way explained below.
- Download and install Poedit.
- Open bunyad.pot in Poedit. Translate as needed.
- Save the file with the ISO language code locale. You can check this list (look under "WP Locale") to find the locale. If your locale is
en_GBIn this case, you would save your file asen_GB.po - Step above should have generated a .po and an .mo file. Copy both these files under the wp-content/themes/smart-mag/languages folder.
- Go to Settings > General and select your language next to Site Language.
- Save a backup of these files somewhere safe. If you upgrade the theme from WordPress admin, the language files will have to be re-uploaded.
If you wish to translate the backend too, you will have to follow the same steps as above but the filename will be prefixed with bunyad-admin-. Example: bunyad-admin-en_GB.po
RTL Version
For languages that read from right-to-left unlike English which is left-to-right, SmartMag will automatically switch to an RTL style, as long as you it's in your language and uses the correct locale (as explained above).
Multilingual Sites
For multilingual sites, the best way is to purchase the WPML Plugin. SmartMag is compatible with the plugin.
When using WPML, we recommend you use Display the language switcher in the WP Menu option and select Main Menu. This will display the languages drop down menu in the main navigation menu.
Advanced Customizations
If you are looking for layout customizations beyond the Style & Typography settings built into the theme, it's important to judge the nature of customization.
If it's a simple layout change, it's very likely achievable by using different the Elementor Page Builder or Custom CSS. However, for something not possible using either of these, a child theme is recommended.
Child Theme
Use the Sample Child Theme
If you downloaded the "All files & documentation" of the theme from ThemeForest Downloads section, inside the zip file, you will find a folder named smart-mag-child.
You can use this to quickly start off with a Child Theme, by uploading it via FTP. This is the preferred way of getting started.
If you're not a dev or don't use FTP, just create a zip file of smart-mag-child folder. You can right click on smart-mag-child in your computer, click "Compress" on Mac OS, or "Send To > Compressed" on Windows PC. Then upload it to your WordPress Admin, like any normal theme upload, similar to SmartMag Installation (Step 3-6).
Older/other methods
Alternatively, WPBeginner has a great article on How to create a WordPress Child Theme.
However, instead of the the style.css and functions.php code mentioned in the article, use the sample codes from below:
Sample functions.php file
<?php
/**
 * SmartMag Child Theme functions.php
 *
 * Please refer to smart-mag/functions.php and smart-mag/inc/theme.php for framework setup.
 */

/**
 * Enqueue the CSS. Please note the CSS order is as follows:
 *
 *  - smart-mag/style.css
 *  - smart-mag/css/skin-XYZ.css
 *  - smart-mag-child/style.css
 *  - Inline Custom CSS from Customize
 */
function my_enqueue_child_style() {
	wp_enqueue_style(
		'smart-mag-child',
		get_stylesheet_uri(),
		['smartmag-core'],
		'1.0'
	);
}

// Enqueue child theme CSS after parent is registered.
add_action('bunyad_register_assets', 'my_enqueue_child_style');

// Alternatively, you may use:
// add_action('wp_enqueue_style', 'my_enqueue_child_style', 22);

// OR, to enqueue after Customizer Additional CSS:
// add_action('wp_head', 'my_enqueue_child_style', 110);
Sample style.css
/*
Theme Name: SmartMag Child
Theme URI: https://smartmag.theme-sphere.com/
Description: A child theme of SmartMag
Author: ThemeSphere
Author URI: https://theme-sphere.com
Template: smart-mag
Version: 1.1
*/
To learn more about Child Themes, Refer to this article (for devs).
Copyright & Credits
Demo Images Authors creative commons, not included
- Demo Images (Not Included): (flickr CC-BY-2.0) Yasser Alghofily, Daniel Zedda, Jonathan Kos-Read, Alejandro Pinto, Jim H., Luis Hernandez, William Cho, Lucas Zallio, Mark Sebastian, Lies Thru a Lens.